I want to grow leeks and alpine strawberries this year, and would like to try tomatoes and a few other things from seeds rather than seedlings. The only convenient place to start seeds at my house would be the basement. It is dank and dim, so some grow lights were in order.
To begin, I cleaned off a shelf and got some flat trays, lids, and seedling warming mats. I could possibly fit four flats on the shelf, but I started off with two.
There are plenty of nice looking LED grow lights on the internet, but the good ones are pretty expensive (like several hundred $ each). Some of the cheaper ones had low light output or were the wrong form factor for the shelf I had available.
I think these expensive LED lights are mainly targeted at the pot growing market, so people can justify shelling out some serious cash for equipment. People starting veggies inside mostly use flourescent tube fixtures. But this is 2015 and the LED lighting revolution is in progress, so I felt like I ought to take advantage of that. And for lights that will be on 14 hours a day, the energy saving aspect of LED was appealing.
Unlike the commercially made LED grow lights, LED strip is amazingly cheap these days on a lumens/$ basis. One could hack something together with scraps and so on to run LED strip, but I wanted these lights to be useful as general purpose fixtures when they are not in service for seed starting. I really like high CRI lighting, like halogens. At work I built some electronics work benches and put high CRI T5 high output tube fixtures on them, fitted up with high CRI bulbs. These are pleasant to work under.
So I ordered a 5 meter reel of "high CRI" white LEDs from ebay. Coming from China, they took a few weeks to arrive.
A number of times through this project I found myself thinking "really? did I really need to make my own lights?? Get a grip!". But what's done is done. I tell myself it was educational for the kids. And that 23 cents of electricity I'll save for the year when compared with fluorescent tubes.
Mechanical
I had in mind to mount the strip inside an aluminum channel which could also accommodate the drivers, a switch, and a diffuser/cover. The strip actually generates a fair bit of heat (input power is ~40W per fixture), which the aluminum helps to dissipate. Not finding a ready-to-use extrusion readily available, I ordered
rectangle tube from OnlineMetals, chopped to length
then cut the top off (leaving a flange for screwing down the lid).
The bandsaw and a file served to make some mounting wings on the end of each channel.
Acrylic scraps from work made up the covers and end pieces.
I did this machine work in about half hour chunks during the occasional lunch break at work over a period of a couple weeks.
The flanges were tapped for M3 screws. The tap I used was munged so it ruined a few holes before I realized it, which I had to go back and helicoil to fix.
After getting all the screws in to hold the channels, covers, and endpieces together, I orbital sanded the lot, then hand finished with a nonwoven abrasive pad. I also added holes in the sides for electrical features.
Electrical
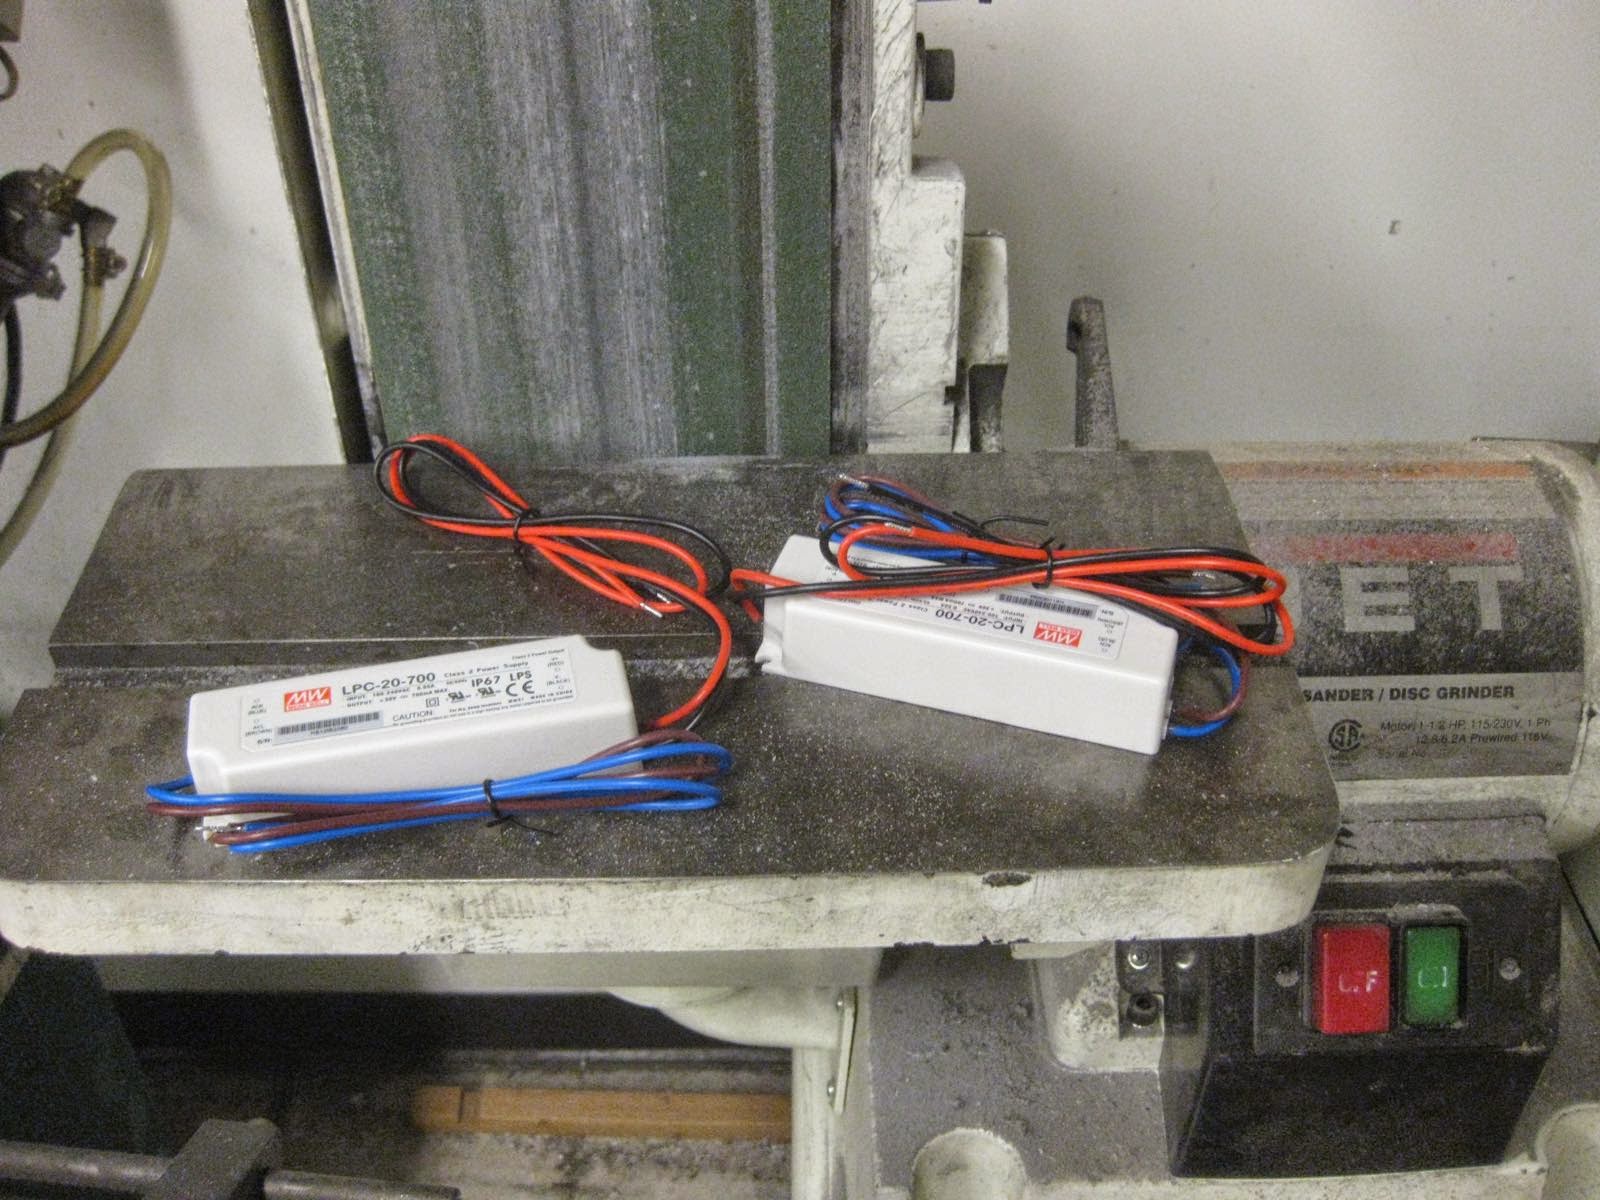
The channels were selected to hold two Meanwell LPC-20-700 20W drivers I got for $10 each on ebay. In reality, the fit was a bit tight, so I sanded the sides of the drivers slightly to make them fit.
Each is held down with a pair of M4 screws.
AC power comes in through a 120V plug
through a plastic cord grip
and into the enclosure
to a toggle switch, then the drivers
neutral went from the service cord to a wire nut, then to the two drivers.
I had to do a little thinking about how to set up the circuit on the output side. Putting three lines of LED strip in the channel would provide about the right load for the two 20W drivers.
But the strip was 12V and the driver output 24V. So I divided the middle of the three strips in two and attached each half to an adjacent full strip, such that I had two sections of strip, each 1.5 lengths. These two sections could then go in series to allow them to run from the 24V drivers. Of course things would be easier if I had 24V strip and two 12V drivers, but this is what was cheap and available on ebay that fit my desired specs.
How to combine the outputs of the drivers? These guys had output voltage to spare, and I expected them to run out of current before running out of voltage. So I just put a 1A diode in series with the positive output of each driver, then wired them together at the input to the strips.
One issue I ran into was that soldering wires to the strips seemed to sometimes burn through the adhesive on the back of the strip and make contact to the aluminum channel. Or maybe the minus side of the strip is supposed to contact the substrate. In any case, the two strip sections worked fine when run separately, but shorted out the two were put in series. The solution was to put kapton tape strips under the places where wires were soldered on. The kids were impressed with the kapton tape because it was colored "golden".
Child 1 and Child 2 were happy to get a chance to do some more soldering, which they are always up for.
The covers were installed
and we were ready to go
Grow Center
These lights are pretty bright (about 3000 lumens per fixture), though I'm not sure the CRI rating is entirely reliable since the quality of the light seems yuckier than other high CRI lighting I've experienced. A 500W halogen worklight puts out about 10k lumens, for comparison. I'm not trying to grow actual big plants inside, I just want to make seedlings for transplanting.
The lights were mounted to the shelves, and I set up the warming mats with my all purpose temp controller box and a thermocouples for feedback.
I set the controllers for 22C, though mostly the warming mats are not quite able to acheive that. So probably I didn't really need the controller. One of the controllers didn't seem to actually work either. I did dig these out of the trash, so that could explain such a condition. Likely the output relay is blown; it is only rated for 3A. So both mats are attached to the output of one controller, with one thermocouple for feedback.
An appliance timer was used to switch both the lights and the heat mats.
Seeding
We have a
garden store nearby which specializes in hydroponic and indoor gardening (i.e. marijuana). While I don't grow that particular crop, it is a useful resource. I stopped in one day on the way home from work to buy coarse vermiculite, worm castings, and compressed cocoa fiber.
Child 3 and I rehydrated a brick of cocoa fiber
I decided to put in a little EM-1 microbe mix. Mostly the advice is to use sterile medium for seed starting. But I thought if any microbes are going to get in there, the best thing might be to pre-colonize the medium with beneficial bugs instead of waiting for pernicious ones to show up. I think we put a capful of EM-1 into the hydration water. No idea if that was a good or bad move, or if will make no difference.
Dang that cocoa fiber really expands. Must have blown up by about 7x!.
We mixed 1/3 each of cocoa fiber, vermiculite, and castings.
Child 1 and Child 3 were all over mixing by hand.
We added some water until it seemed well hydrated but not wet, then distributed to a 36 cell pack which I bought from Johnny's.
Then we sprinkled on seeds from Alexandria, Mignonette, and Yellow Wonder alpine strawberries, all from
Annie's.
and barely scuffled the potting mix about the seeds.
We made sure the seed and upper part of the soil was moist.
We also made up a 36 cell tray with King Richard and Megaton leek seeds, from
Fedco. Then we put the covers on and put them on the warming mats under the lights.
The seeds were started on Valentine's Day (2/14/2015). A little less than a month later, the leeks are doing fine. I've thinned them once already but should do so again I suppose.
And the strawberries are all germinated excepting one cell.


.JPG)