

Our backyard, while big for a built up urban area, at about 240 square meters it is not very large in absolute terms. After renovating the back yard in late fall 2013, we were left with about a 9x12 meter space that wasn't already spoken for; this was frost seeded with ecolawn mix and covered with a thin layer of salt marsh hay at the end of the renovation.
Over the winter I read several books about small scale grain growing. As I am wont to do, I got unreasonably excited to make some efforts on this new project.


These were available from the library, except the newer one from Jack Lazor, which I ended up buying. I thought Sara Pitzer's book was probably the most applicable, but the Lazor book was closer to my climate. Logsdon and Lazor are both aimed at production on a scale that while small by modern standards are far beyond anything I could fit in my yard.
Planning
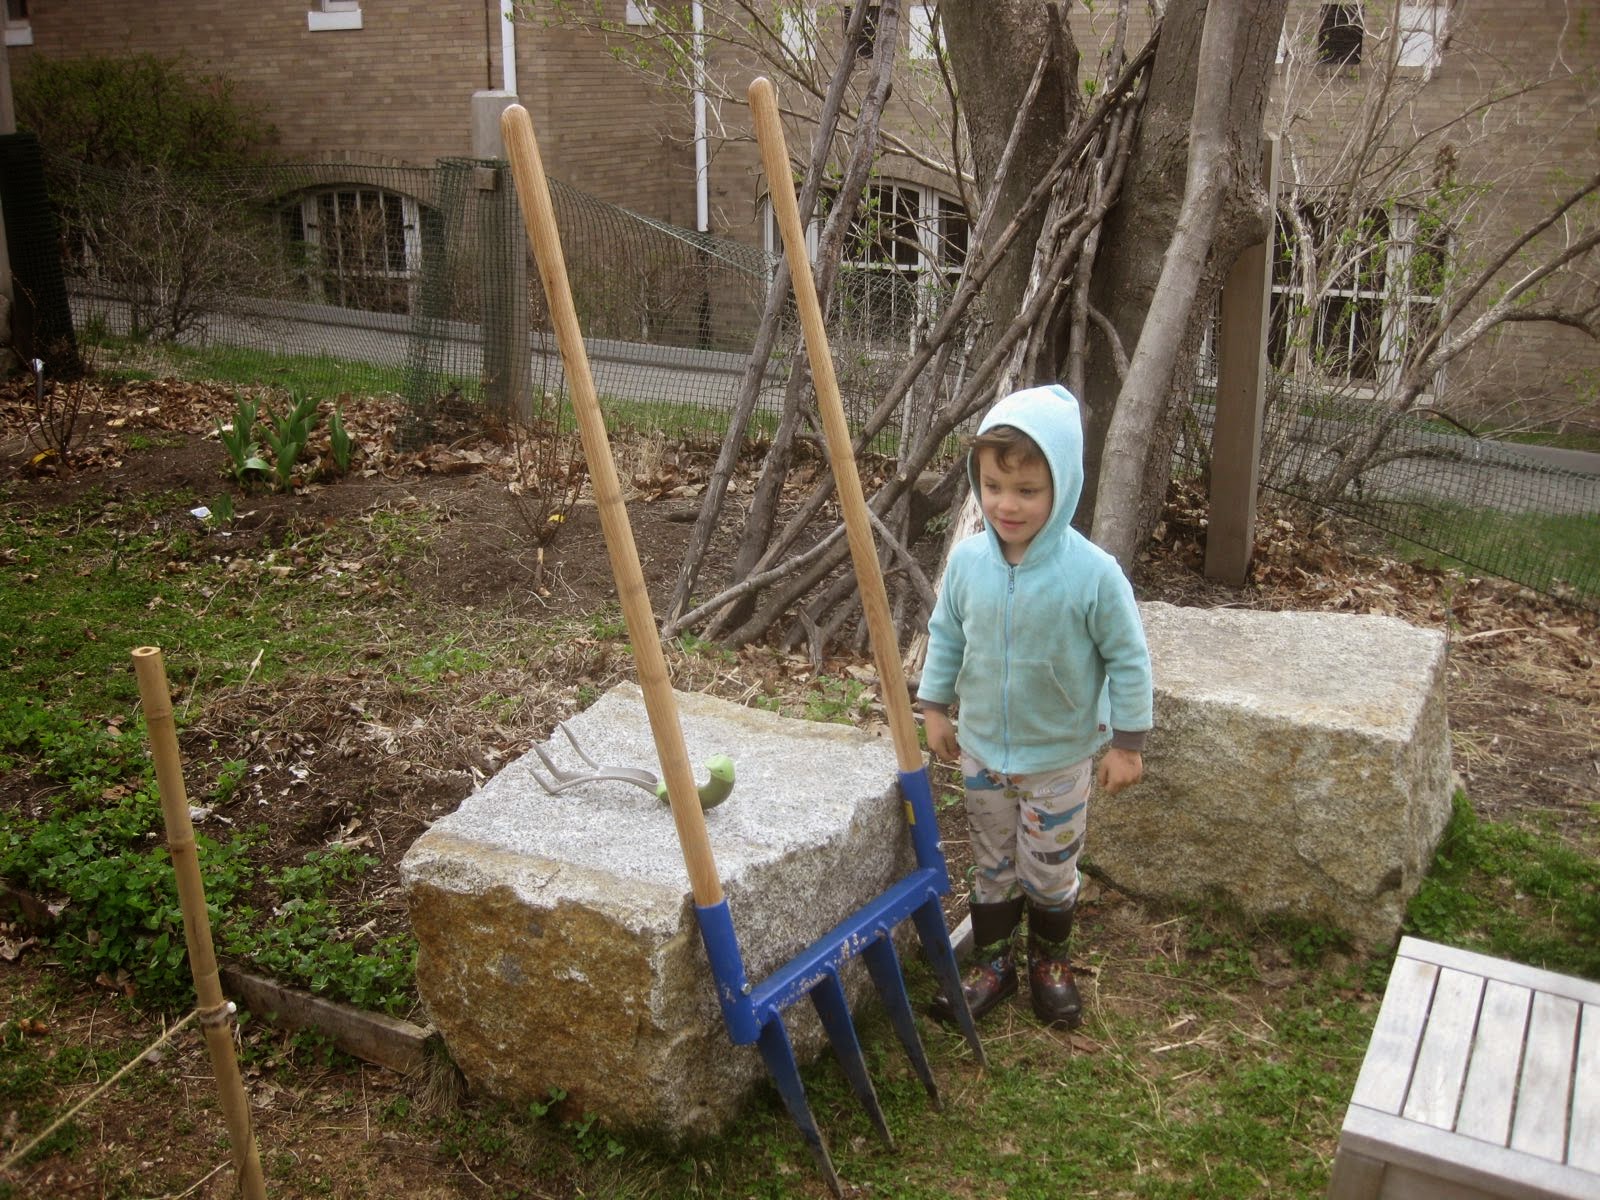
After planning to locate the compost house in the upper left quadrant of the lawn area and having reconstructed the play house in the lower left quadrant, there was really only one place to put a grain patch. The lower right gets too much foot traffic, is useful as a gathering space, and is shaded heavily from the house in the afternoon. The upper right quad, beyond the granite blocks, seemed the natural fit despite being shaded by a sycamore maple to the south. There was some concern that we would miss the grassy space, since the open lawn area was already quite small.
I thought it would be fun to lay out the grain area in fixed beds, with paths for access. At the time I was busy daydreaming about 3 meter tall corn and sorghum, and hit upon the notion of making a micro sized grain maze. Playing around with the layout on the computer, it was not possible to fit anything complicated since the space was really only about 3x4 multiples of a reasonable bed or path size. This is what I ended up with:

There were many other projects already on my list of things to do last spring, so I wanted to try to accomplish this grain maze with as little labor on my part as possible.
I ordered a bunch of rough cut, local, green pine in 1x3 (25x75mm) along with the wood I ordered for building the compost house. This was cut and assembled with stainless screws right on top of the hay in the lawn area.

My thinking was that I would fill the frame with compost and grow some amazing cover crops in it for the first couple years, to penetrate the hard undersoil in the future lawn area, and to add organic matter to the area. I had bought and read a great ebook by Anna Hesse about no-till cover crops in the home garden called Home Grown Humus.
My thinking was that I would fill the frame with compost and grow some amazing cover crops in it for the first couple years, to penetrate the hard undersoil in the future lawn area, and to add organic matter to the area. I had bought and read a great ebook by Anna Hesse about no-till cover crops in the home garden called Home Grown Humus.

Since then, I've read a bunch more of her ebooks and have read through about half the archive of her blog.
After building the frame, it appeared a little pointy in two places, so I chopped these in place and put on 45 degree pieces instead. Then the frame was filled with compost from Cambridge Bark & Loam.

First Year Crops
Last year, I grew spring wheat, oats, buckwheat, sorghum, clover, and oilseed radish. Results were mixed, and generally not as good as I might have wished. I often felt that instead of a grain maze I was operating a big bird feeder. But it was a good experience, fun to tinker with, and I think the area looks cool in the yard.
This is what I planted in the maze in 2014:

Wheat
I got a packet of Black Eagle spring wheat from Fedco. There turned out to be very few seeds in it, so I planted these on a roughly 15cm grid in the area shown. I manually poked a hole with a stick about 2cm deep, dropped one seed (sometimes two) in each place, and covered with soil. Most all the seeds came up and grew strongly at first. After the wheat was up a bit, I spread some seed for mammoth red clover. These two plants grew well together, and the wheat looked cool when it headed up and while it was drying down.


Child 2 and I harvested the tops of the wheat plants with kitchen scissors in late July.


This wheat turned out to be pretty hard to thresh. The long black awns look awesome, but make it hard to feed through any kind of machine,

and the kernels are difficult to separate from the stalk in the first place. I ended up having to go over each head by hand with rubber gloves, twisting and shearing bit by bit down the head to tear each row of kernels apart. This also broke off the awns, which I could then pick out by hand from the bucket I was working into.

After processing, we were left with 113g of wheat grains, or about 37g/m^2 of bed space. I think I could have planted a bit closer together if I had more seed; these plants did not tiller much anyhow. Maybe that is a reflection of poor growing conditions I provided; rock hard soil under the thin layer of compost and less than full sun.
I toasted the wheat in a cast iron pan,

put on a little olive oil and salt,

and we enjoyed it as a snack.

Oats
Having read about what a challenge it is to hull regular oats on a small scale, I bought a bag of naked oats from Johnny's. I thought worst case they would make good cover crop, and best case we could get some grain. Unfortunately, the neighborhood birds had other ideas. I tried 4 times to plant oats, and birds ate most of the seeds each time.
Once they got big enough to not be interesting to the birds, they did ok.


Also, there was a significant hull on about 5% of the grains. These would be unpleasant to eat, so they were picked out by hand, which is not very scalable.

Our yield was 173 grams of finished oats, or 58g/m^2. With all the replantings, it is highly likely I used more than 173g of seed!
I soaked the oats overnight, then simmered them for about 40 minutes.

There was enough for all five of us to have a bowl of oatmeal, which we dressed up with 2014 home made applesauce. It was actually really good.

Rather more chewy instead of mushy like oatmeal from store bought rolled oats. I enjoyed the extra texture and the flavor was excellent.
I think if I were to grow oats for grain again, I would figure out a dehuller and plant regular oats instead of naked oats. Maybe this would put the birds off a little too, but I suspect I would still have to net the beds for a few weeks after planting.
- Broadcast seeds in early spring, rake in a little. Birds ate them all.
- Broadcast seeds, but then cover with salt marsh hay. Birds ate all the seeds.
- Drill the seeds in, by poking a hole, putting in a seed or two, then covering. Birds dug up most of the seeds and ate them.
- Drill seeds in, then sprinkle Ropel animal repellent on the surface. Birds didn't care. They dug up the seeds and gobbled them up.
There was one particular mourning dove would would sit up on the fence watching me plant the oats, then as soon as I went inside it would fly down and start finding and eating the seeds. Some of the oat plants did come up, and in late spring I transplanted these together into about 3 square meters of bed so I could plant other things. For some reason the birds just didn't bother the wheat much, but were all over the oats. My conclusion is that I can't plant oats without netting over the top until they get a few cm tall.
Once they got big enough to not be interesting to the birds, they did ok.
We cut the heads of the oats in late summer when they looked done, then let them dry a while inside. Threshing was not that easy because the grain tended to want to stay in it's pannicles, and the chaff is very fluffy and voluminous. So you can't really bang it against the side of a bucket too well.
Also, there was a significant hull on about 5% of the grains. These would be unpleasant to eat, so they were picked out by hand, which is not very scalable.
Our yield was 173 grams of finished oats, or 58g/m^2. With all the replantings, it is highly likely I used more than 173g of seed!
I soaked the oats overnight, then simmered them for about 40 minutes.
There was enough for all five of us to have a bowl of oatmeal, which we dressed up with 2014 home made applesauce. It was actually really good.
Rather more chewy instead of mushy like oatmeal from store bought rolled oats. I enjoyed the extra texture and the flavor was excellent.
I think if I were to grow oats for grain again, I would figure out a dehuller and plant regular oats instead of naked oats. Maybe this would put the birds off a little too, but I suspect I would still have to net the beds for a few weeks after planting.
Sudan Grass
If the birds loved oats, they were absolutely crazy about Sudan Grass seed. I bought a bag of it from Johnny's to use for cover crop and high grass. Same story as the oats, but I sowed seed even more heavily. I must have put down many thousands of seeds in several tries at this, but only one or two plants grew. So this seems to be another plant that can't be grown in the grain maze without netting.
It is kind of impressive how the birds could glean these smallish dark seeds from soil at a yield of around 99.9%. I now think those fairy tales where the hero enlists the birds to speedily sort grains from ashes are perfectly realistic. Real birds would totally do that without even being asked, but would eat the grains rather than turn them over to the hero.
It is kind of impressive how the birds could glean these smallish dark seeds from soil at a yield of around 99.9%. I now think those fairy tales where the hero enlists the birds to speedily sort grains from ashes are perfectly realistic. Real birds would totally do that without even being asked, but would eat the grains rather than turn them over to the hero.
Sorghum
After my difficulties with the birds on oats and sudan grass, I wanted to try sorghum, which is reputed to make nice tall grass and some grain. I ordered seeds from Southern Exposure for Mennonite and Tarahumara Popping Sorghum, and planted them in 4 squares of the maze with bird netting over the top. The netting was stretched onto pine frames I screwed together with lumber left over from building the borders for the grain maze. It was left in place until the growing plants were up to the level of the net (~8cm). This worked fine, but it was annoying to have to use the nets, and I would need to build a lot more of them to net the whole maze.

The sorghum came up fast and grew quickly, though only reached about half the height expected for the varieties I planted. I planted these rather late, so I wasn't sure I would actually get grain out of them, but I thought it would be fun to try anyway.

In the event, I think the Mennonite sorghum ripened pretty fully and Child 2 and I harvested the heads full of reddish grain with scissors in late October. The Tarahumara didn't seem fully ripened, but did have a sizeable load of white grain so we cut it anyway and let the heads dry inside for a few months.

The sorghum made thick and voluminous straw too, which I cut down and layed on the beds as winter mulch.

After drying out in a paper bag inside for a few months, we began processing. The red sorghum mostly fell out of the heads with some banging against the sides of a 20L plastic bucket.

The white sorghum was harder to thresh, probably because it didn't have long enough in the field before we cut it. But overall the threshing was certainly easiest for the sorghum when compared with wheat and oats.

The yield was a lot higher too. The Mennonite (red) sorghum gave us 125g, or 62.5g/m^2, and the Tarahumara (white) sorghum yielded the highest at 253g or 84.3g/m^2, almost three times higher than the wheat per growing area!
We ground up all the red and some white sorghum in the C.S. Bell gristmill,


and made pancakes over two weekends with the resulting meal. I used half sorghum meal and half regular wheat flour for the recipe, and the resulting pancakes tasted great, especially topped with boiled cider or homemade apple sauce.


The remainder of the white sorghum was toasted dry in a cast iron pan. I was a little disappointed that none of the grains popped anything like popcorn; maybe this would have been different if the grain had time to finish up before harvest. One source puts this variety at 110 days, which is really almost too long for our location and I planted them a few weeks late. But we ate them without much trouble as toasted grains seasoned with olive oil and salt. Not a very high bar I guess since almost anything tastes good if you roast it and apply salt and olive oil!
But I'd say so far sorghum is the clear winner for this particular location at this point in time. High grain yield, good looking high grass, easier threshing, and good eating.
Buckwheat
Much of the area of the maze was planted in two crops of buckwheat, the first going in a week or so after the frost date. This plant came up quickly, even with some eating by the birds, and grew up well. We put out a box of ladybugs on the baby buckwheats, which Child 3 had wanted to buy from the garden store.

It did not reach it's expected height either, but put on many nice flowers which were absolutely humming with bees. The foliage lent a lush feel to the backyard.


Once the plants started making seed, they really foundered. Originally I had though if the plants made grain, we could harvest it. But the grain appeared to be ripening at different times, and would easily fall off the plant when ripe. So harvesting would need to be a continuous type operation of shaking the plants every day or two into a tray or something. My mom told me that once when she was young she had a job going out to gather buckwheat growing wild in southern California.
But the plants were looking like they were doing poorly anyway, so I decided to call it a soil improvement instead of a grain crop and strike it down.

I went around and pulled them up by hand, and it was clear that the roots had pretty much stopped cold at the hard soil layer, preferring to stay in the compost we had put in the frames on top of the earth. I planted a second crop of buckwheat into the scattered debris of the first. These again came up well, but started yellowing and looking weak even before flowering.
These were cut with the scythe this time and left in place like the first crop, with oilseed radish sown into the stubble and straw a few weeks later.

Oilseed Radish
The other crops I planted did not seem to make much headway at mixing and enriching the underlying soil. But I had high hopes for oilseed radish, after reading One Straw Revolution by Masanobu Fukuoka. I cut down the buckwheat and planted the radish seed into the stubble, also putting seed down where the oats and wheat had been. This was in early September. The sorghum was still going, so that area did not get radishes.
The radish came up well, but did not grow that large or make big roots by the time it was killed by low temps in November. Probably should have planted them earlier.

Techniques and Equipment
Final Threshing
After some initial hand threshing, the resulting mass of grain and chaff was put through the C.S. Bell grain mill set to a wide spacing to further work kernels out of chaff.

Big chunks of plant were fished out by hand.

The kids all had to take baths after both the hand threshing and the grain mill threshing; they were itchy all over, probably from little bits of plant fibers in their clothes irritating their skin.
Winnowing
To winnow the grains, I looked over a few designs on the internet. We were looking to winnow in the absolute depth of winter, during the record breaking snowy month of February. So outside it was usually a furious blizzard, with gusty swirling snow, fierce wind, and bitter cold. I couldn't really see us pouring the grain between containers and letting a breeze pull away the chaff. This guy's pedal powered grain processor is awesome, but I didn't have the bandwidth to do such a project at that time. The final stage of his project involves feeding the material into the top of a tube while blowing air in and up the tube with a forge blower. The grain drops out the bottom of the tube, while the chaff blows out the top. Thinking about doing this operation inside, it sounded like a better idea to get the air movement with vacuum instead of pressure. This could be supplied by my wood working dust collector, which would serve to collect the chaff.
I bought a length of expensive clear 2" PVC tube from McMaster; I felt it would be cool to see what was going on while feeding material through. A few fittings in cheap white PVC gave us a starting point.

I made up a feed tray with some aluminum flashing.

I attached and adjusted a blast gate at the top of the winnower so that while feeding material most of the grain fell out the bottom, but little or no chaff.

The wheat and oats needed some hand scrubbing to thresh the small number of grains left that still had chaff on them. These were then run through a second time.

Here is a little video clip of running the winnower.
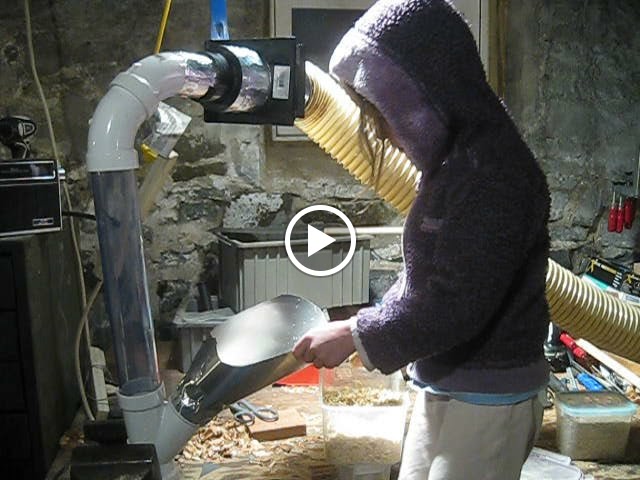
After we ran all the threshed grain through and took it apart, I had a look down the 4" main dust collector tube. Significant amounts of grain were visible in there, so clearly my apparatus needs more tuning. No idea if 2" is a good size, though my feeling is that bigger would be better. The 4" PVC was too expensive for me, but now that I know what to expect I think a 4" HVAC metal duct might be an improvement. Also not certain where the best place to put the feed in T would be, but it seems to me like the higher the better.
Plans for 2015
In the fall, I frosted most areas with compost from Landscape Express. I didn't do the radish areas since they were still living at that point, but they got composted in the spring. The Landscape Express compost has less drinking straws and bits of plastic but more broken glass than the stuff from Cambridge Bark & Loam, but neither type of trash makes one feel good about putting it on the garden. I wrote Landscape Express an email asking about possible contamination with persistent herbicides in the clopyralid family, but they didn't respond. Anyone have a source for low cubic meter-ish quantities of organic compost that can deliver to Somerville? I'm pretty freaked out about poisoning my garden for multiple years with herbicide residue, and picking out plastic and broken glass damps down the romance of gardening.
This winter I read The Resilient Gardener by Carol Deppe and really liked it. It was fun to read and made me really want to grow more staples. Much of what she has to say is not totally applicable to me due to big differences in climate and garden scale, but I still found much to be interested in. She says corn is by far the easiest grain to process, and after my experience in 2014 with the small grains I think something that takes less work to process sounds great. I am much more interested in flour and flint corn growing than previously, and would love to eat some delicious parched corn. Her book also made me want to grow more potatoes.
After reading and returning The Resilient Gardener, I ordered The Tao of Gardening, which was just getting stocked into the Minuteman Library system. I hadn't been attracted to the title before hand, but after reading the other book by Carol Deppe I was eager to check it out. It was also a fine read and made me want to grow early season "eat-all" greens.


So I have some plans for this coming season, which more or less make the grain maze into just more garden space.
As soon as the snow finally cleared off and the soil had unfrozen a bit, I pulled the winter mulch that was not yet broken down off the beds. Then I topped off with a little more compost and some azomite and used my awesome new broadfork to loosen the underlying hard soil layer.
It took me a few hours to fork over the grain maze beds; the compost layer was nice and fluffy but almost completely stratified from the underlying hard, clay heavy soil. It was clear the buckwheat made no inroads into the hard soil layer, while the sorghum, oats, and clover had penetrated it with some amount of root mass. Some earthworms were in evidence, but evidently hadn't had enough time to work the soil much. Maybe a few more years of no till and cover crops would do the job, but I don't want to wait that long.
The forking process was hard on my pine frames, popping them apart at a few joints. Hrmm. Even with the perfect tool for the job (the broadfork), this was not a tremendously easy job. I really had to put my full weight on the tool and wiggle it front to back and side to side each for tens of seconds to get it to sink into the earth, and it would lift up a big clod of tighly stuck together hard soil. I'm hoping in future this area will be much easier to fork, like the beds up on the terrace and our front raised bed.
On April 5, I planted most of the seed for the layout shown in the diagram below.

The front potato boxes have been planted with perennials, so are out of the layout now. I put in groundnut, sunchoke, and crosnes in these, all from Food Forest Farm.
After planting, we had a few weeks of cold interspersed with a couple warm days. On April 15, the mustard and radishes were up, and on April 17 I saw the first pea sprouts breaking the soil, the spinach had come up, and a few tiny tang hao sprouts. Favas are just coming up now (April 27), despite being dug up by the squirrels on multiple occasions.
I'm sure having deer is a lot worse, but there is truly a scourge of squirrels in our urban-ish location. They dig up pretty much everything in the fall to bury nuts, and in the spring looking for them again. They also enjoy chewing plants off at the stem, lopping off the heads of sunflowers, and they made short work of the baby hazels we planted last year.
We've decided to remove the two little beds by the granite blocks and turn them back to grass. The kids have really taken a liking to climbing the nearby forked Sycamore Maple in the side bed there, and it is hard to access without trampling those two beds. The idea is to move the rocks and build a little treehouse/platform in the tree with a ladder up to it. Moving the rocks should be interesting. Using a density for granite of 2.67 g/cm^3, I estimate each rock weighs about 450kg (!). I'm thinking of big lever bars to get the rocks up on blocks, then freezing a sheet of ice in the winter to push the rocks on runners to where they want to go.
So I didn't fork those beds and only planted them with early season greens, expecting to remove the beds in the summer.
When the dandelions bloom, I'll plant German Butterball potatoes, and at the end of May I'll plant Pennsylvania Dutch Butter popcorn, Hopi Black Dye sunflowers, and pole and bush beans. This will give me the following layout for the summer season.

Most likely this won't turn out all that well for some reason, but one must try if any improvement in results is to be expected. Someday I am going to have an awesomely productive garden. The only question is how many years I have to work on the soil and myself to get there.