January 29, 2014

Homemade Fermented Pickles


I have always disliked pickles, though the last decade or so I could stand to nibble on the little plates of assorted kimchee pickles you get at the korean restaurant as part of a meal. Never really felt like I was missing out on much, until I read "Cooked" by Michael Pollan. This was a highly enjoyable read, and I recommend it to anyone with an interest in food.

January 22, 2014

When pants turn to cannibalism


I am now entering year 3 of the No Buying Clothes Adventure. I started this endeavor two plus years ago with 5 pairs of pants in various states of wear. By this summer, they were pretty much all unwearable despite numerous repairs. It had gotten to the point that the fabric around a rip was not in sound enough condition to anchor thread for a fix; it would quickly tear loose and take more fabric with it. I had to hope that the holes in the bum of the pants wouldn't line up with the holes in the bum of my underwear.


One of the goals of this project was to motivate me to make more clothes, and indeed I've had a pair of pants in the works for some time now. But when I got them finished last winter, I found that they fit poorly so I took them apart for some adjustments. They are still in a drawer in the dining room waiting for me to put in the time to get them done.

In the meantime, I've had to dig deep to excavate some clothing to cover my lower self. I pulled out all the worksuits I used to wear when I was younger and selected the ones that I could still squeeze my fat middle aged corpus into. This took care of 4 days a week with no doubling up. Below is a picture Child 2 took of me in a classic worksuit which was originally bought at a used clothing store when I came to the Boston area to attend university in 1994. It is extremely durable and pretty comfortable. I didn't know it at the time, but later was told by an employee of Green Mountain Power in VT that it is a worker coverall from Hydro Quebec.


I may be the biggest fan of worksuits this side of Asian factories, but it is nice to wear something besides one piece outfits sometimes, so I decided to butcher up the worst of my pants to make repairs on the best of them.


This is one advantage of having more than one copy of something; as things wear out you can use one as a donor corpse to keep the other running.

The khaki colored ones were not only both in horrible shape, but dirty and stained as well. It wasn't clear either pair would be worth wearing, even after fixing the enormous rips in the seat and crotch area.


These pants all came from Express and I've been happy with their performance over the years. Each pair has surely been worn and washed over 200 times. One failure mode is that the seat and crotch fabric becomes thin and fragile. I blame this on all the rubbing the area endures. From my bike seat, OK!!? Geez.

Last year I put about 6000km on my bike commuting to work, which really takes a toll on one's pants. The seat is worn, also dirt splatters up and once in a while a pant hem gets caught in the chain. This can be an exciting event when riding fixed gear.

So the khaki pants were hopeless, but I had two pairs of dark gray that were good candidates for combining.

Big patches of good fabric from the legs of the donor pants were fashioned into repair pieces and affixed to the seat. Unfortunately this makes the back pockets non-functional. With more work I could have maintained the back pockets of course, but I don't use them much so I felt expediency was the better choice.

The front pockets were also worn through and separated at the edges. These got a strip of good fabric folded over and under on both sides. Before on the left below, after on the right.


The fly was worn through in the area over the zipper on all pairs, and was reinforced on the recipient pair with a strip of butchered fabric. Before to the left, after to the right in the pic below.


The fifth pair is light gray, which I made into frankenpants with pieces cut from the donor pair of dark gray.

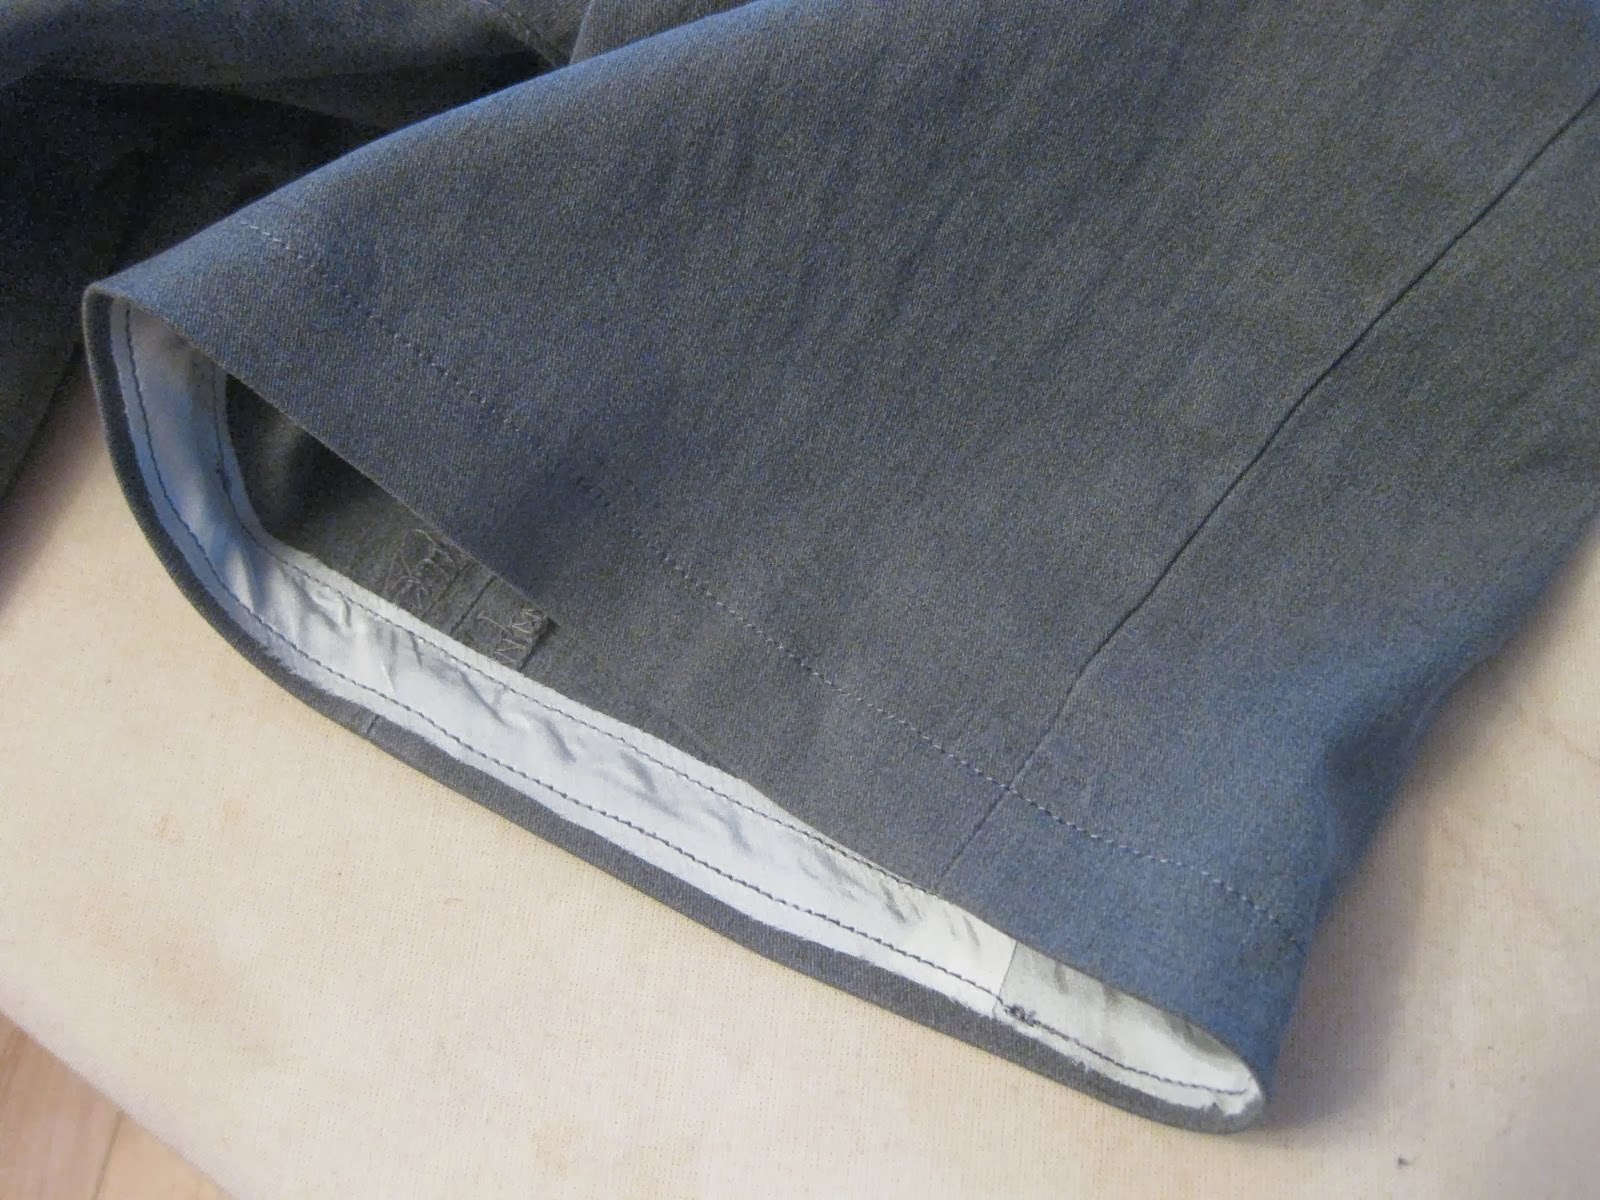
The hems are ragged and worn through on all pairs.


These get trimmed and pressed under by about 5mm. I used a piece of 19mm bias cut silk ribbon to help me on the hem, so I only needed a single short turn in and thus preserved almost all the length of the pants. Could have added a lengthening strip around the bottom to make up the lost length, but this was much faster and almost as good. As you can see, I also didn't bother blind stitching the hem up.


The light gray pair also had the big biking induced rip out in the lower bum area, and smaller rips at the inside edges of the back pockets, like the other pairs.


 After putting in the upper bum patch, I crudely basted the big rip together before applying some shaped patches over the problem zone.


Sweet!


Here are the pocket and fly repairs on the light gray pair. These areas get a few hand stitches to finish the ends, where the machine is not happy to go.


So out of five pairs of thoroughly worn out pants, I now have two pairs that I can wear in public! Wonderful. They are not going to last terribly long before wearing out in other weak spots, but I'm hoping it will increase my runway for making myself new pants.

January 13, 2014

Urban Edible Paradise: Planning


We have lived at our current house for about 12 years, and have always had a dream that we could eventually make both the inside and the outside of the property beautiful, elegant, and in the image of our own desires. The reality of life being what it is, this is more of an ideal to work towards rather than an expectation of future results. The inside of the house is pretty much done now (only took 12 years, ha ha). Though certainly things may be changed around again someday, and all things degrade over time and need fixing.

This typical Somerville two family house was never built to be fancy, and it never will be. But we are very happy with what we have done inside, and are incredibly fortunate to have such a lovely, spacious place to live on a relatively big lot in a great urban(ish) location. We are also lucky that we have had the time, resources, and skills to renovate the interior. Now we can begin to turn our attention and efforts toward the exterior and the landscaping.

January 9, 2014

Brewing Kombucha


I suppose it was really just a matter of time.

Our ex-housemates Alexi and LeeAnn used to drink Kombucha and I was always very skeptical. Last winter I was sick and eventually took some antibiotics, which had the unfortunate side effect of totally wrecking my stomach. I've never experienced anything like that with antibiotics before, and it was awful, even after I was done with the drugs. Becky got me a bunch of Kombucha and Kefir to consume when I couldn't eat any actual food. Luckily over a month or so my stomach recovered, but I had come to rather like the Kombucha by then.

So we have been wreaking havoc on the grocery budget by buying plenty of G.T.'s Kombucha from Whole Foods, or the odd jug of it from the Kombucha guy at the Somerville farmers' markets. It seemed like the sort of thing we should by rights make ourselves if we were drinking it regularly, and it is quite cheap if you make it at home. 


I didn't have a quick way to get a scoby, so instead I made up a 4L batch of green tea with a cup of sugar in it, then dumped in the dregs from about 6 bottles of G.T. It took about three weeks to grow a thin slug at the top of the two jars I was fermenting it in. I threw the first batch out and transferred the mini-scobys into a fresh batch.


I think I'm up to about 6 batches or so now. Most weeks I make a 4L batch and leave it in the closet fermenting for a week or two, innoculated with a splash of liquid and the scoby from the previous batch. The optimal ferment time for me still hasn't stabilized; sometimes its a week other times two plus. But keeping the cycle going is pretty easy and sometimes the  results are just as good as G.T.'s (even when this is not the case it's still fine to drink). I ferment in two 2L glass jars with cloth rubber banded around the top.

For some reason my scobys don't float reliably. They often sink to the bottom and a new one forms at the top. Or they turn sideways near the top and the new layer grows on the edge of the old one. I was under the impression that the main one should live at the top surface and add bulk to itself. Have to wait and see how things develop I suppose. 


Since I brew hard cider in the fall and drink it year round, I have a CO2 tank in my kitchen closet and drink cider from 2L PET bottles with Liquid Bread tops. I dedicated one of these setups to Kombucha, and carbonate and serve from the PET bottle, rather than fooling around with a secondary ferment in a closed container. I'm sure the Kombucha puritans would be horrified :)

We favor the ginger version of G.T., so I started experimenting with adding ginger to the finished Kombucha. First I tried slicing thinly, letting the slices sit in the Kombucha for some days, then straining them out before drinking. Slices are visible in the jars below.


This was ok, but didn't succeed in imparting a whole lot of ginger flavor. Lately I've been using a different method.


grate the ginger (without peeling it).


Put the gratings and stray juice into a linen cloth


 then squeeze the juice out. 


Divide in two portions


Dump 'er in


A sizeable lunk of ginger gives the 4L of weekly brew a tasty ginger flavor; could probably use a little more to equal G.T. levels but fresh ginger is not the cheapest thing to buy in quantity from the regular market.

I like this stuff, and I'm sure its good for the gut, but I must report it is not a health miracle for me. Despite drinking about 2L weekly (plus Chia every morning), I've been sick on and off this winter with colds and sinus infections for over 2 months. Given what happened last year though, I'm hesitant to take antibiotics except in circumstances more grim than I am presently experiencing. Anyway, the Kombucha can't hurt and it tastes great.

Child 1 (now almost 3yrs) actually loves drinking it too. "Hassum... that... kombucha! I love kombucha!". The girls are not so hot on it, but occasionally Child 2 has a few sips.


UPDATE 4/2014
With essentially unlimited Kombucha available, consumption has crept up. I've started brewing each week in a 5L Fido bail top jar.


It's not too demanding now that I have a system figured out:

  • Fill jar from filtered water tap to appropriate level
  • Pour in pot, boil
  • Add 3 TBSP imperial gunpowder green tea
  • After >5 minutes, add 1-1/3 cup white sugar
  • Let cool in pot with lid on overnight or all day (I busted my first big Fido jar by putting the tea in hot, then rinsing the jar with cool water)
  • Strain loose tea out with small colander
  • pour through strainer into Fido jar, with lid removed
  • pour in some Kombucha from previous batch
  • transfer scoby from old to new batch
  • cover new batch with cloth and rubber band, stick in closet
  • dose old batch with 3 ginger juice ice cubes, put lid on jar, stick in fridge
  • next day (sediment drops out during cooling) - pour through strainer into PET 2L bottle, carbonate with CO2 in PET bottle, enjoy as desired
  • Repeat until 5L jar in fridge is down to dregs
We are finding that especially with the one big jar, the taste is better after 2-3 weeks fermentation than the one week we were averaging before. So I now have two jars at any given time in the closet, and one in the fridge which we take from during the week.

For ginger, it was getting time consuming to manually grate and squeeze the ginger every week. Lately Becky has been getting me a big load of ginger about once a month. I peel it by hand, 


then grate it with the food processor (wish I had a hand cranked grater...).


The gratings go into a linen towel and get squeezed for juice.


The juice fills up about one ice cube tray. After freezing, the cubes are put into a plastic bag and stay in the freezer until needed.


UPDATE 3/10/2015
Latest process uses 1/4 cup gunpowder style green tea (cheap if you buy a big sack of it on Amazon or at the asian grocery), and 1 cup sugar. I let it ferment for three weeks ideally, plus or minus a week. Usually there are two fido 5L jugs in the dark pantry closet, so I end up making a new jug every 1.5-2 weeks.

When I switch the scoby to a new jug, I put in 3 ginger juice ice cubes, then let the jug sit in the fridge for a day or two. This allows the goobers and sediment to separate a bit before I pour through a strainer and funnel into a 2L PET bottle for forced carbonation. The 2L only uses half the batch from the fido jar, so I pour the rest into a 2L glass mason jar and put that in the fridge. It settles further while we are drinking the first 2L from the PET bottle, so when I refill the PET from the mason jar I get the maximum usable kombucha.

I don't bother peeling the ginger anymore, just rinse it, chop roughly, then into the grater.