

I'm closing in on the last quarter of year 3 in the No Buying Clothes challenge, and my set of wearable clothing continues to diminish. I have been in dire need of trousers for almost two years, but recently my last two sets of frankenpants (made from sewn together pieces of about 5 pairs) have started to disintegrate beyond even my ability to wear them. They have numerous big rips and are about as thick as tissue paper in most places. I have to be very careful not to make sudden motions when I wear them. Luckily I have lost a little weight recently, which opened up some additional shirts from my old clothing archive, but did nothing to help with pants.
I have in fact been working on a pair of wool trousers for about two years now, and almost had them done last spring, just in time for the onset of hot weather. I couldn't imagine wearing spiffy wool pants around with my usual old t shirts, so I concluded I had to sew up a white dress shirt and suspenders to go with the pants. This of course delayed the project further, but now it is finally done. I just need to make about 5 more sets and my wardrobe will be in much better shape...
Pants
My dream was to wear incredibly high waisted wool pants held up with braces. To start out, I drafted up two patterns. One was a draft along from atailormadeit using a historic draft for trousers. The other was for Classic Trousers from Metric Pattern Cutting for Menswear.
I cut up an old duvet cover and made a muslin from the Classic Trousers pattern I had done. The waist ended up too low on me.


But otherwise it seemed wearable,

so I tried to bring the height of the waist up in the pattern without changing much else, i.e. jacking up the body rise to an outlandish value.
Next I cut my pre-washed wool fabric. Unfortunately I can't remember where this fabric came from, but it has been in my stash for a while. Probably from Fabric.com. It is very soft and comfortable, despite being wool, so maybe it is part cashmere; I know I have bought some cashmere/wool blend fabric and put it in the stack. Every time I work with high quality wool, I remember what a pleasure it is. It just shapes and presses so beautifully under the steam of my iron. Mmmmm.
I mostly lined the edges with Hug Snug binding, as described here.

For pocket bags and other inner fabric I used some scraps of white cotton/linen blend.

With the high rise waist, it seemed a long way for the pocket to go up all the way to the waist, so I made them mousebite style with the pocket edge returning to the outseam. In retrospect, the openings are a mite small, so maybe I ought to have taken up to the waist after all or at least made the opening bigger. Also the pocket bags are too small. And even though I understitched the seam, the lining fabric turns out a little at the pocket edges and is visible.

I made back pocket bags to catch in the waist of the pants during construction, and figured I could add some welt pockets back there later on. So far I have not gone through with that since now that I am wearing these trousers I am gun shy on putting slashes into the bum for fear of messing them up.
The fly is button down, with a inner button strap, and a hook and bar. Fly construction is straight out of Making Trousers, by David Coffin Page.

The top button ended up too high, so I just don't bother buttoning it when wearing the pants.
I made the fly before I had the buttonholer for the Singer 99, so I did the holes by hand.

They look ok from the wool side, but painfully poor on the lining side

One of the main problems with the finished pants are that the fly lining is slightly visible from the front of the pants. If I had used a dark fabric for the lining it probably wouldn't be that noticeable, but the white lining is a high contrast eye magnet to my groin, unfortunately. Or at least I worry that it is.

The fly was basted shut and the parts were sewn up,

and ended up much too big.

What happened ??!

Had I subconsciously assembled with the stitching line too far toward the seam allowance?

I made up a second muslin from the pattern I actually used on the wool (modified from the original pattern after evaluating the first muslin). This time I used actual muslin.

Ah much better. The stiffer fabric made it easier to evaluate than the muslin I did with the old duvet cover.

Ok. I could wear pants like these.

I marked the waist location, then ripped down and pressed the muslin pieces and transferred to a new paper pattern.
I ripped the wool pants down, pressed the pieces flat, remarked the seams from the new pattern, and resewed the garment.
I struggled with the waistband, initially trying for a grown on fishtail waistband. This did not work out for me at all. I trimmed down the waistband so I could use a folded over strip of fuji broadcloth silk as an inner member.

No extra interfacing or tape is used; we'll see how that works out. After attaching the silk waistband lining, I topstitched all around from the wool side to hold down the silk liner. Which made it look almost like a regular waistband.
Try on time.

Still too big.

Arrgh!

Becky said I looked like a comedian with my too big pants flopping around with their high waistband; like at any minute someone might come and dump a bowl of soup into my pants. Yes, one of the many things I am thankful for in my life is a partner who wouldn't think of letting me take myself too seriously!
Good thing she didn't see them the first time I sewed them. The soup in the pants thing has now become a staple of household jokes, and is applied in other contexts.
Bah! They went into a drawer for months until I could face them again.
A few weeks ago, my desperate need for wearable clothes compelled me to take the pants out again. Besides, I had been haunted periodically by this thought:
Will I let this pair of pants that I've been fighting with for two years defeat me? No! I will taste Victory over you, high waisted wool trousers with nobody inside them!
After another try on, I reluctantly concluded I was going to have to rip at least the side seams from the waist down to the hips and resew them. They were way too big when I last looked at them, and I've lost some weight since then so it was even worse than I was expecting. Ripping out the sides was a lot more annoying since I had already done the waistband, but it ended up not being too terrible. I left the silk inner waistband full size and just folded it over after resewing the side seams in the wool. A little hand work made things come together reasonably.

The first resewing made the fit too tight, but I got it pretty good on the second try (the side seams in that area have now been sewn at least four times). I wanted the fit to be loose enough that the pants could slide up and down over a tucked in shirt without causing the shirt to get hiked up. This means the pants will fall down if not held up with suspenders.
The fly and closure buttons are the larger aluminum looking ones I pick from the bin at Sew Low in Cambridge.

The brace buttons are 19mm cast metal, which I purchased in a pack from ebay during another project.
The hem was set after I finished the braces and the shirt, though even with that I might have wished to make them about 5mm lower than they came out. But they are ok; isn't a high hem on trousers fashionable these days? Looks pretty good with clog boots too, not as great with my usual red shoe clogs. I just topstitched the hems in, which lacks sophistication but is a lot faster than invisible hemming by hand, which is my other option.

Shirt
Meanwhile, I had started two white shirts from a pattern I drafted out of Metric Pattern Cutting for Menswear.

First I made a muslin, adjusted the pattern, then cut two copies in white cotton broadcloth. I've not spent the time to master flat felling, so I often use french seams to finish edges in medium or light weight cloth, and I did so on this shirt as well. The shirt came out fairly well; had to lower the bottom hem location and take in the side seams a little.

I tried to think of the easiest possible shirt design, to facilitate getting this outfit done. I made a slash and placket at the sleeve opening, then finished the sleeves and collar in what amounts to a band binding.

I'm fine with this actually; kind of looks interesting.

The sleeve pattern was a one piece draft from Metric Pattern Cutting. Think I'll make it slightly closer fitting on the next set of shirts, but it's quite good as is.

In the vein of trying to make the shirt very simple, I put in a couple darts in the back from the armscye rather than doing a yoke. I made an inverted pleat in the center back, intending to stitch it down in the upper back, then let it open up below the shoulder blades, kind of like what you would end up with if you did an inverted pleat ending in the yoke seam. In the end I thought the shirt a little poofy so to contain the volume I left the pleat basted shut.

The buttons are all the small metal ones picked from the salvage bin at Sew Low.
Braces
Once again, the overriding principle was this:
finish this #$*(& project so I have some clothes to wear!!
With that concept in mind, I went with non-adjustable braces made from 50mm wide black grosgrain ribbon. In back I folded over twice and blasted in some button holes with the handcranked singer 99.
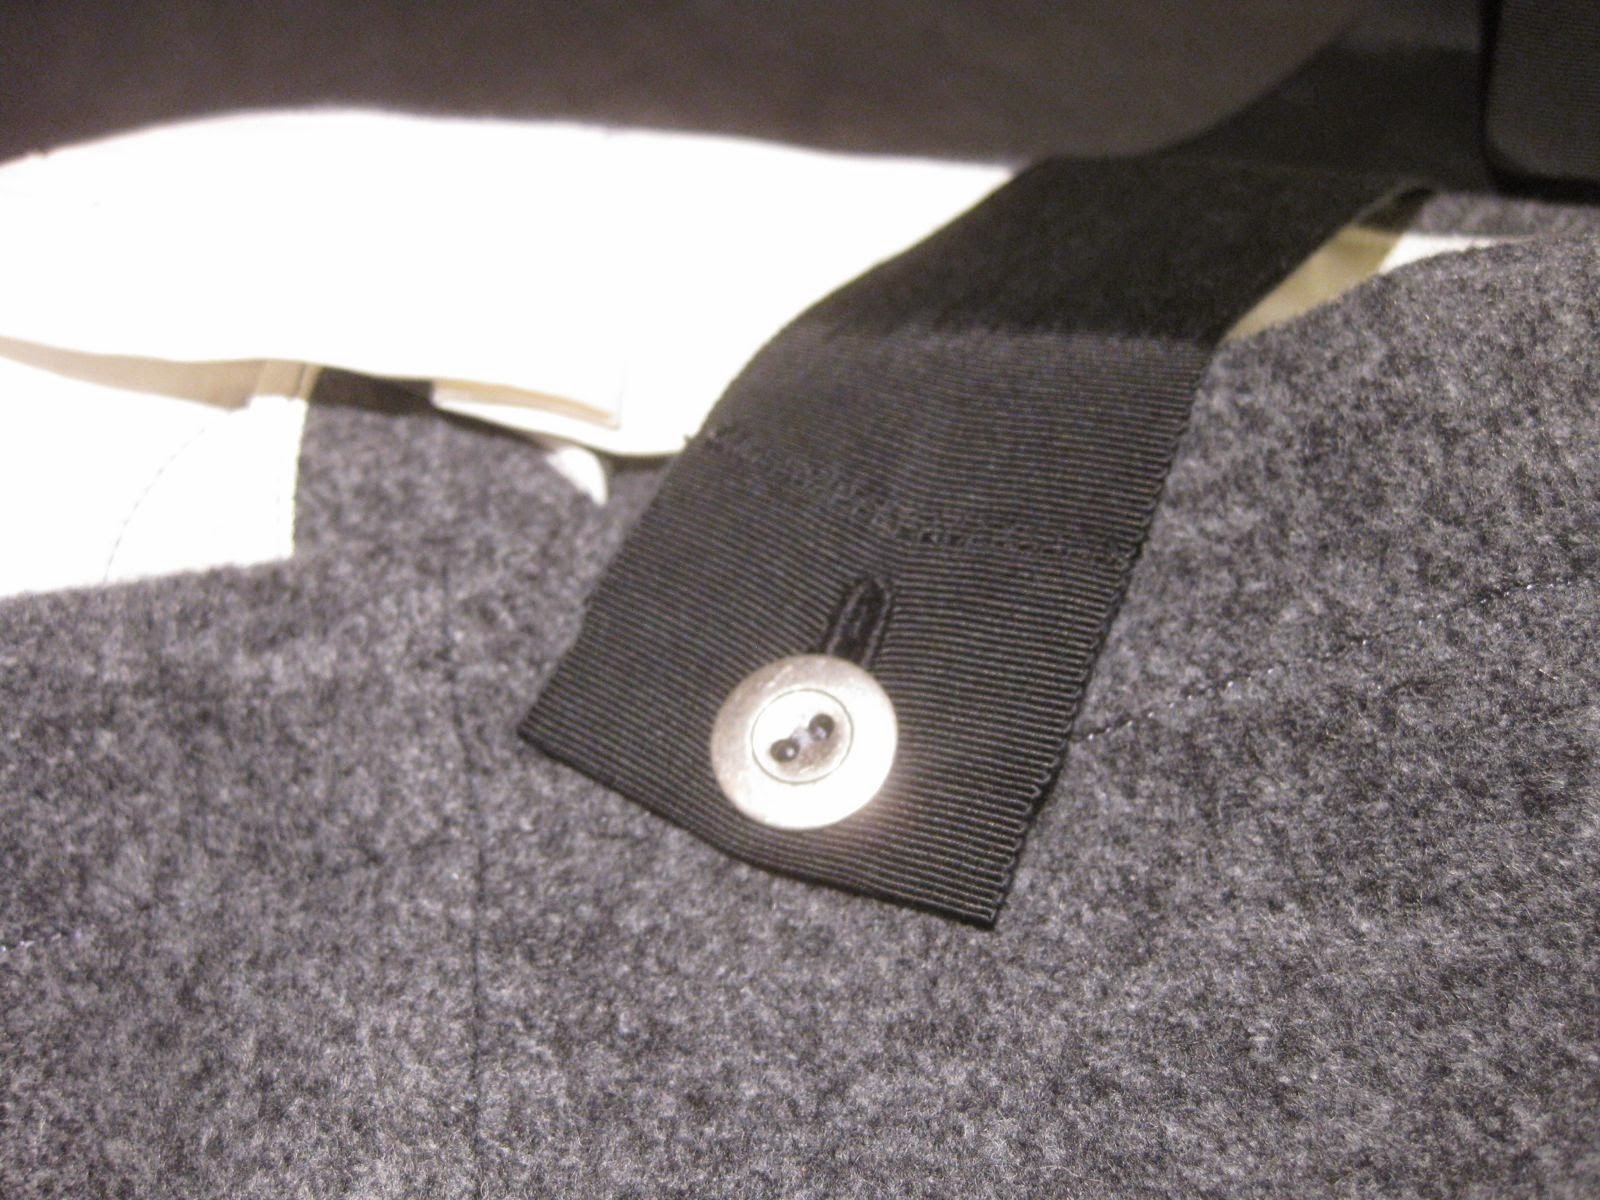
In front, I cut some button on tabs from 1.2mm veg tanned leather, then rubbed in some grease from my all purpose moisturizer/lib balm/leather treatment, aided by a little heat from a stove burner.

I attached the ribbons using a sort of foldover approach which sandwiched the tabs between ribbon on either side.

These were stitched in with the W&W D9. I find that the edges come loose unless you do a few stitches around the edges to start and finish.

I've had trouble with these X back loose, non-elastic suspenders tending to fall off my shoulders. I know my kids have the same issue in the clothes I've made for them with similar braces arrangement. After the first day of wearing this outfit, I sewed the X together in the cross at the back, which really helps the falling off issue.

Results
These trousers are actually very comfortable to wear. The fit is easy, the braces hold them up nicely, and the fabric feels nice against my skin.

The shirt is also good, though being a white shirt I'm sure it will get stained soon enough. I have quite a few tuck in type shirts in my closet that I have not been able to wear these last couple years because I didn't have suitable pants to go with them. So finishing a reasonable pair of pants has a magnified effect on expanding my range of useful garments.
I pulled out my pair of women's size 12 heeled wood sole clog boots in olive suede to go with the outfit. With those boots and the new outfit on, I feel like a million bucks. Yeah.

Points to improve:
- The fly is pulled open a tiny bit and the white lining fabric is visible
- The lining fabric is visible on the pockets, even though I understitched those seams
- Pocket bags need to be bigger
- Better layout of buttons on the fly
- Maker inner waist button tab bigger
- Somewhat closer fit
- Better fit all around
- Reduce bulk at the side seam where the bottom of the pocket comes in
4 comments:
Constants in the universe: gravity, entropy, pocket bags always need to be bigger. Your process is excellent (love the binding on the interior bits) and the results are quite fine. Quite handsome, sir!
I enjoyed following the pants and shirt adventure. I was wondering at a couple of points how this would end and actually the outfit ended rather well and looks nice on. Two things that might be helpful. If the length continues to shorten,pick out the hem with a seam ripper and face it with some gray bias cotton woven. I do this with my grandson's suit pants as he grows taller. I think you will enjoy this pattern as you get it tweaked. If the facing showing bugs you, acrylic paint comes in a load of colors and is really cheap. If the contrast showing bugs you, just doctor the lining with a touch of paint. If they were black pants you could touch with a sharpie marker. You'd probably enjoy the braces more if they were made of black elastic. I had rolls of black from the Newark catalog and also other black things like webbing when I used to make some items for my daughter's horse showing. Anyway keep up the good work. I am sure these are way better than the patched frankenpants that it probably is time to say goodbye to. I always enjoy your family adventures at doing things the way people used to do them.
If you want a handpicked-style hem instead of a topstitched hem, try blindstitching the hem. It works particularly well on wool as the loft of the fibres hides the stitches.
If you have only the treadle or true vintage machine it might not work, but the blind stitch is essentially a single zigzag followed by 3-5 straight stitches.
No blindstitch foot is really needed as their main purpose is to leave a little extra thread for stretching the hem back down. You can do that by loosening the upper thread tension.
I'm a recent convert, as I don't watch TV (AKA hand sewing time). It's a technique I was scared to try and am now determined to use on all lofty fabrics.
Love your trousers and I will definitely review my David Coffin Trousers book as I do my next pair of pants.
Thanks for the comments and tips everyone!
I don't have a working machine with zigzag right now, which I think is essential for the blindstitch function. Maybe there is a mechanical attachment I could fit to the Singer 99. I did do a machine blindstitch hem a few times when I had a machine capable of it (a Kenmore), and I came away feeling like it was something I might as well do by hand if I wanted it to look great.
On not putting in elastic:
I am trying to stay away from elastic and zippers. My theory is that the garments will last longer that way, and I also view it as a fun challenge. But there are occasions when elastic really seems useful, like contemplating pants for my 3yr old son, or underwear for myself. The non-elastic braces have been fine since I stuck them together at the cross in the back though.
Post a Comment