

Something like a month ago I was making my usual sprouted einkorn sandwich bread, when my KitchenAid popped a tooth in the attachment gearbox whilst grinding up the sprouted grain. I resolved to get a better food grinder, and thought the amount of power input required and frequency of use at our house would make a human powered machine attractive. Turns out there are plenty of rusty old hand cranked meat grinders on ebay for pretty cheap! I rejuvenated this one and put it to use.
Enterprise Manufacturing Company was a firm based in Philadelphia, and they made meat and coffee grinders, sausage stuffers, and sad irons, among other things. I haven't tracked down a good internet history of the company; if you know of one please point me toward it and I'll post it here.
There is a successor company to Enterprise which is still making these today, called Chop-Rite 2. Apparently the new ones are cast iron with a powder coated teflon of some sort as the finish. Probably quite serviceable. There are loads of chinese clones available on ebay and elsewhere for cheap. And if you just want something that will work well and be problem free, LEM makes one out of stainless that is probably excellent and is reasonably priced at $85. But my insanity causes me to be attracted to the antique ones. Part of it is that I think it is morally superior to get used things instead of new things in general. Also I like the idea that the physical things in my life have some history in the world; these somehow have more character than a new item. And after 80 years or so, the weak ones have been weeded out, so I have more confidence in the item's ability to perform the task it was designed for. Another advantage of used stuff is that it is often a lot cheaper than something new, and sometimes of higher quality.
Usually the antique needs some attention to make it work properly or a tune up to get the most from it. This process, which nearly always takes far longer than I had initially thought, helps me get to know the object and understand how it works and what might go wrong in the future. I think being more familiar with your machinery is a good thing.
Of course occasionally it is the case that useful design improvements have in fact been made in the last 100 years, as opposed to changes made for purposes of design for manufacturing, cost cutting, and planned obsolescence. In this case the antique may not be quite as functional as something new. Other potential drawbacks with an antique can be that it might have excessive wear, and getting replacement parts can be impossible.
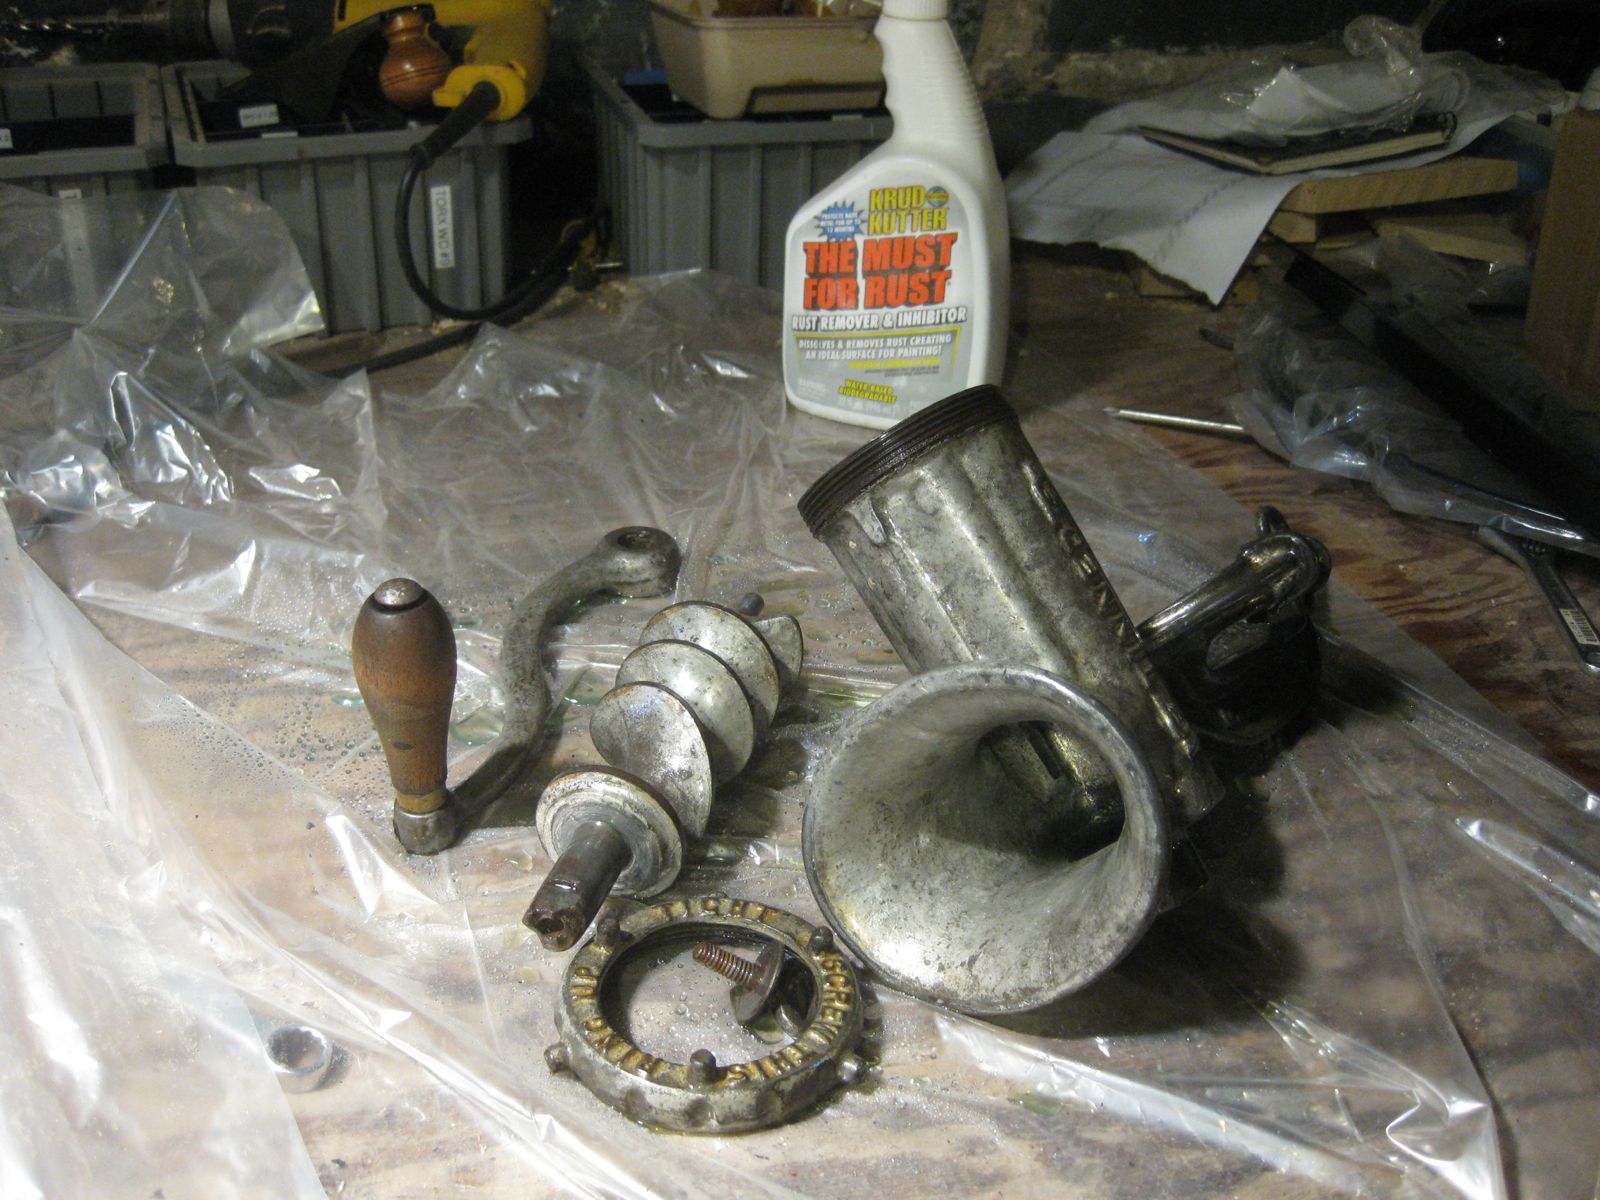
I bought this Enterprise #10 clamp on grinder on ebay for about $20.

The first step is to pull it apart and see what is what.

As you can see its a bit rusty, and there appeared to be little bits of whatever was last run through it still present on the inside. I joked with my sister Annesly that we should taste these morsels and see if we could tell what flavor sausage was last made in the machine.
I bought a replacement stainless chopper blade, with 3, 6, and 12mm cutting dies also in stainless from Butcher-Baker. The other parts I sprayed down with a phosphoric acid de-rusting spray from Home Depot and let them sit for about 20 minutes.
After a thorough rinse in hot water, I dried the pieces out in the oven at minimum heat.

This is usually the wire brush stage, but this device was originally tinned to prevent corrosion and there is a fair bit of the coating left intact that I didn't particularly want to strip off with the wire wheel. So I just wire wheeled the threads on the barrel, which were not tinned but were filled with gunk and rust. I also gave this treatment to the screw for the table clamp.

Next came some manual brushing of the internal recesses and inside the external lettering and corners with a brass toothbrush.

On to the buffing wheels. I did black compound on a hemp wheel, then brown compound on a sewn muslin wheel.

Finally, I put on a coat of furniture wax on the outside surfaces and shortening on the inside surfaces, buffed it out, then cooked it in the oven for a little while (not the wood handle) to help the wax and grease penetrate pores in the cast iron.


There were a few mechanism type repairs to make. The biggest problem was that the anti-rotation pin which prevents the die plate from spinning was sheared off and munged over such that it was no longer effective.

I milled it down with a 3.175mm end mill in the Bridgeport at work,

then tried to drill and tap a hole in it to extract the pin with a machine screw. Unfortunately, the pin was significantly harder than the surrounding cast iron and I probably didn't do a good enough job centering the drill hole on the flattened pin. So the drill deflected to the interface between the cast iron and the pin and drilled down there, rather than into the center of the pin. I decided to try to just use a stainless cap screw in place of the pin, which is not ideal from a cleaning perspective, but does serve the anti-rotation requirement admirably.

I took it home, washed it out with soap and water, then thought about the other issue that could use some attention, namely the bottom clamp. Either by sloppy initial design/manufacturing, or through years of hard use, the screw from the bottom clamp now sticks up proud of the clamping pad. So if I clamp it to the table, the screw is biting into the table before the clamp pads land. I think the best thing to do will be to afix some plastic pads to extend the reach of the clamp pads, but for now I just use a little piece of wood between the counter and the bottom clamp such that the end of the clamp screw digs into the wood until the clamp pad lands.
One final test was to see if there was lead in the tinning. Of course people back then though lead was nature's wonder material and views have changed on that in the intervening century. I scraped up a bit of the coating and used a home lead test. Not as good as an XRF test, but these things do work most of the time. No sign of pink or red, so I feel better about putting my food through it.

Here is the grinder, ready for use. My hand is in there for scale. This thing is pretty large.

Grinding Sprouts
After fixing the grinder to the counter, I installed the extruder screw, along with a PTFE thrust washer I had in my basement as an extra from my cheese press project a few years ago. Which happened to fit perfectly. It's moments like these that make me feel slightly better about hoarding so much junk. I avoided having to order a $1 washer from McMaster Carr and having to wait one extra day. Sweet! Somehow that justifies the 5000kg of what Becky calls my "garbage" clogging up the basement...

You can see the end of the shaft is broken off, but for now the handle has enough engagement on it that it seems to work ok.
Next comes the chopper.

Then the die plate. I started with the 3mm plate for grinding sprouted Einkorn.

Finally, the retaining ring. Read the text cast into the ring. "SCREW THIS RING UP TIGHT". How's that for a self documenting machine!!?

This grinder is about four times the sectional area of the Kitchen Aid grinder, so it made short work of the liter of sprouts I had.

The crank got very hard to turn right after this, so afterwards I metered the sprouts in more slowly such that the screw was barely loaded. Even still it was hard to turn; I think the 3mm die was too small for this extremely sticky and thick material. The 3mm holes were also pretty annoying to clean out; the die is like 7mm thick, so the aspect ratio is not favorable for releasing a plug of sticky stuff. Got it done though:

Sausage
Next up was to grind some meat and see how the #10 fared. Since I don't have a stuffer yet, I decided to try to make some breakfast sausage from the recipe in Charcuterie, by Ruhlman and Polcyn. I got a 700g chunk of pork shoulder and scaled the other ingredients to suit. I cubed the pork manually, then chilled it in the freezer for a little while in a glass casserole pan until partly frozen while I prepped the other ingredients.

The pork cubes were tossed with the other ingredients and put through the grinder with the 12mm die installed. Whew! Smooth like butter! Very easy and fast to crank it through. I

replaced the die with the 6mm one and ran the mix through again, once more amazed at the speed and effectiveness of the grinder.

The output of the grinder was mixed for a short period with a little liquid in the KA, which served to bind the mixture together.

Finally I formed a big log in a sheet of plastic wrap, partially froze it, then cut it up into little sausage patties. Here is my dinner plate with some test pieces, along with kale and fresh cornbread. Yum!

UPDATE - 7/22/2015
I've decided to sell this grinder. I've tended to use my Enterprise #5 for almost every occasion, finding it less work to set up and clean. For the amount of stuff I have to grind at one time (a kilo or two at most), it is more than up to the job. Even I must conceded that I don't need two antique meat grinders and the #5 is a better fit for me. If you are interested in the below #10 set send me your offer at holly dot gates at g mail dot com.

The package will include the fixed up #10, the old plate and chopper, plus 3 new stainless steel dies (3mm, 6mm, 12mm) and stainless chopper from Butcher-Baker.com.
15 comments:
Wow! That was a lot of work. I have one that my mother had stored in a basement for 40 years. It is huge and heavy. I can barely lift it. I don't know how the woman of the house was able to use these with ease. It is amazing how much time was spent making the meals. Well worth it I am sure!
Hi,
thanks for posting about this, we lost our blade and need a new one, we had this passed from generation to generation and brought it from Africa to the USA, do you know which one on the link you posted would be a good blade to grind meat to make sausage?
Thx
Chris
Hi Jason, thats cool that you have a family heirloom meat grinder! The blade is always the same; its the four arm blade shown in the pictures that fits on the end of the extruder screw. The die plate is changed to give different sized grinds of meat. I've made breakfast sausage with the 6mm (1/4") die on my #10, and with the 5mm die on the #5, both with good results.
Any idea where I can acquire a handle for a #10?
Sunnyuno1g@gmail.com
I think keeping an eye on the ebay listings is the way to go. I wouldn't be surprised if you see a handle listed at some point, but it might be just as cheap and easy to get a full #10 in poor condition and just take the handle off. The handle would be easy to clean rust off and get ready to install on your #10.
Holly, I just found the same meat grinder in my basement from my Mother. Any idea on the date it was made
Thanks
Marla
Holly,
I came across your blog whilst looking for spare parts for my #10 Enterprise grinder. The end of my shaft is broken too, and I am missing the thumbscrew. Somehow, sometime after I moved out, someone broke it before my Mom gave it to me. Mine is a newer one, without the antique embellishments. It was purchased at auction from Arlington County Virginia Public Schools in 1972, when they did away with individual kitchens at each school. I am now looking to see if chop-right makes a screw and worm for it...
Love to see vintage tools brought back to life. I have an Enterprise No. 12 and a No. 22. A No. 32 is my Holy Grail.
My fami8ly used these grinders for over 65 years and we cut up meats, clams, and veggies for chutney and such with fairly good ease. The Plates will often cost what a whole chopper will go for on ebay; buy the chopper and plates there if you can or just use the parts from Your old one ifsomething breaks.
you can get a stuffing tube that fits inside the big ring also there is a special plate you can get (not necessary) that has two huge holes so the meat is not ground again
Thanks for the grinding tips! I'm registered fro the meat grinder attachment for my wedding shower and I've got my fingers crossed that I get it! We eat a lot of venison instead of ground beef, its healthier and cheaper
This is ultimate guide about meat grinder for buyer and very helpful.
I bought a enterprise #12 antique THAT WAS ALL COMPLETE . HAd VERY LITTLE TINNING LEFT. I dipped it (after taking apart) in a bucket of light acid for about 10 minuets. Proceeded to wash it down with a water hose. dried it with a grass &leaf blower. before rust oxidation took place I used several wire brushes using an electric drill. With little patience got it cleaned and shiny. After this I'm still stumped as to what to coat the inside works for it to grind away??? J.Lason
Hi Jaime. You can use crisco or coconut oil, or any food safe grease to coat it with. If you choose one that is solid at room temp, it can be helpful to heat the whole thing a bit in the over to get it to soak in.
Here's a page of history on this company. Enterprise. Enjoy, https://hsmcpa.org/index.php/component/k2/item/146-enterprise-manufacturing-company
Post a Comment