July 21, 2014

The Virtues of Wooden Shoes


The virtues of wood shoes are manifold
  • 100% renewable, biodegradable materials
  • Durable, long lasting, and can be renovated
  • Impact, pierce, and crush resistant
  • Heat, cold, and chemical resistant
  • Waterproof
  • Luxurious comfort, at least for standing on hard surfaces and light walking
  • Meet CE standards for safety shoes
  • Fashionable, even dare I say cute?


I've been wearing wood shoes part time for about 8 years now. I'm surprised they are not more popular! I've got a total of three pairs, and given that I can work on them myself, I anticipate I'll be able to keep them going for a long time. One pair is a tight fit, for thin socks and summer wear. Below is me with my first daughter at the park for lunch, 7 years ago.


Another is a loose fit, to accommodate two pairs of wool socks for winter bike commuting (as seen in main picture at the top, with gaiters).

The third I usually leave at the bottom of the basement stairs to use as cellar slippers. Child 1 asked me to get her a red pair which I was happy to supply.


Many people including me feel terrible after spending any time standing on concrete. My job, while not as on your feet as a hospital job, still involves many hours spent standing in the lab, which is concrete topped with vinyl composition tile. Standing on concrete in wood shoes is way more comfortable than standing in regular shoes. I've also worn them to work trade shows, which are hell on my feet and back with normal shoes.

They do take some getting used to; heavy wool socks are helpful. The various wood shoes I have bought have not been ready to wear as purchased. Since the vast majority of wood shoes sold these days are sold as tourist trinkets rather than functional footwear, a few tweaks are helpful prior to trying to wear them. In particular, there is a sharp transition around the inner edge of the foot hole that ought to be eased, especially where it curves over the arch. This can be accomplished quickly with a rasp


and some sandpaper.


Once this is done, the process of breaking in your feet can begin.

The shoes actually do break in a little bit, in that the bottoms become softer after repeated exposure to water and walking. The edges of the bottoms also wear as you walk in them to make taking steps more comfortable. But I think the main thing that needs to happen is for the nerves in certain parts of your feet to become less sensitive. After about a year of wearing the clogs at least once a week, they are actually quite comfortable.

If you want to get a lot of baffled looks, try wearing wood shoes while traveling through airports. They have a nice loud clack on the hard floors which draws plenty of attention from any people who are around, who are rewarded for their curiosity by seeing something unusual and puzzling. Sometimes when we are out together Becky thinks people are checking her out, and that she must look extra good that day. But then she is irked to find they are actually just checking out my shoes!

I got my first pair of wood shoes in Holland just before my eldest daughter was born. We were visiting my good friend JD and his wife, who were living in Amsterdam for a year, and we had a wonderful trip. One day we took the train out to see a living history style Dutch village, Zans Schans. Here are JD and Anne on our day trip:


An attraction I definitely wanted to see there was the Klompenmakerij.


They had a set of fascinating machines from the 1920s or 30s for making wood shoes. The wood starts out green, which makes it very easy to work though I imagine some shoes are lost to cracking during later drying. These days most wood shoes seem to be made from poplar, but I read that willow used to be preferred. A typical medium diameter log might get split into quarters to make 4 shoes per length of trunk.

The first machine was a pattern copying lathe. A shoe to be copied was mounted between centers, while the green wood blank is mounted between another set of adjacent centers. The pattern and blank are revolved synchronously at a sedate pace while a pantograph like arrangement rides the surface of the pattern while moving a circular saw like cutter in an analogous fashion over the blank. In this way, most of the exterior of the shoe is formed.


The second machine is an internal pattern copy mortiser type arrangement. The blank and the pattern are locked in place and a pantograph controlled cutter is used to first cut the heel pocket, then repositioned to reach up into the mid and toe sections.


The leftover centers extending from the shoe are chopped off and it is allowed to dry. Then the outside is sanded down. When I was watching the wood shoe making demo in Zans Schans, I started thinking it would be neat to wear these shoes. So after thinking about that, I purchased a pair in Amsterdam.

My two other pairs have been bought on the internets, from DutchVillage.com.

I bet 99.9% wood shoes made are for tourists to buy and take home to use for planters, bird houses, decorations, and other uses besides shoes. But there are a few people who actually wear them. I saw a worker at a construction site in Amsterdam wearing wood shoes. I talked to him about it, and he was the one who clued me in to their ability to meet the criteria for safety shoes in the EU. Also the guy working the demo at the wood shoe workshop. And on occasion, an elderly dutch mechanical engineer at my job.


I really want to get around to making some uppers for one of my pairs, like the boots shown above (photo taken from the Klompenmakerij). This would be great for winter, and would keep snow out better than the gaiters I think.

One other resource for those interested in wood shoes is this book:


I had to buy it, since for some reason they didn't have it in the library.


Renovation
We've all been there, right?. Your favorite pair of wood clogs is worn flat in the heel and canting to the side.


Or maybe the bottoms are worn clean through.

Luckily wood shoes, in addition to being completely renewable, durable, compostable, and fashion forward are pretty simple to work on with basic woodworking tools.

My experience is that the heels wear out first. I've reheeled a few times, in the following photos I used some 12mm thick poplar leftover window stop molding.

The main complicating factor in an otherwise simple operation is that in my case at least the heels don't wear evenly.


So the question is how to fill the gap between the new bottom piece and the remainder of the shoe body. Typically I first epoxy on the bottom, then go back and fill in with wood wedges and more epoxy. Finally, sand around to contour and clean things up.


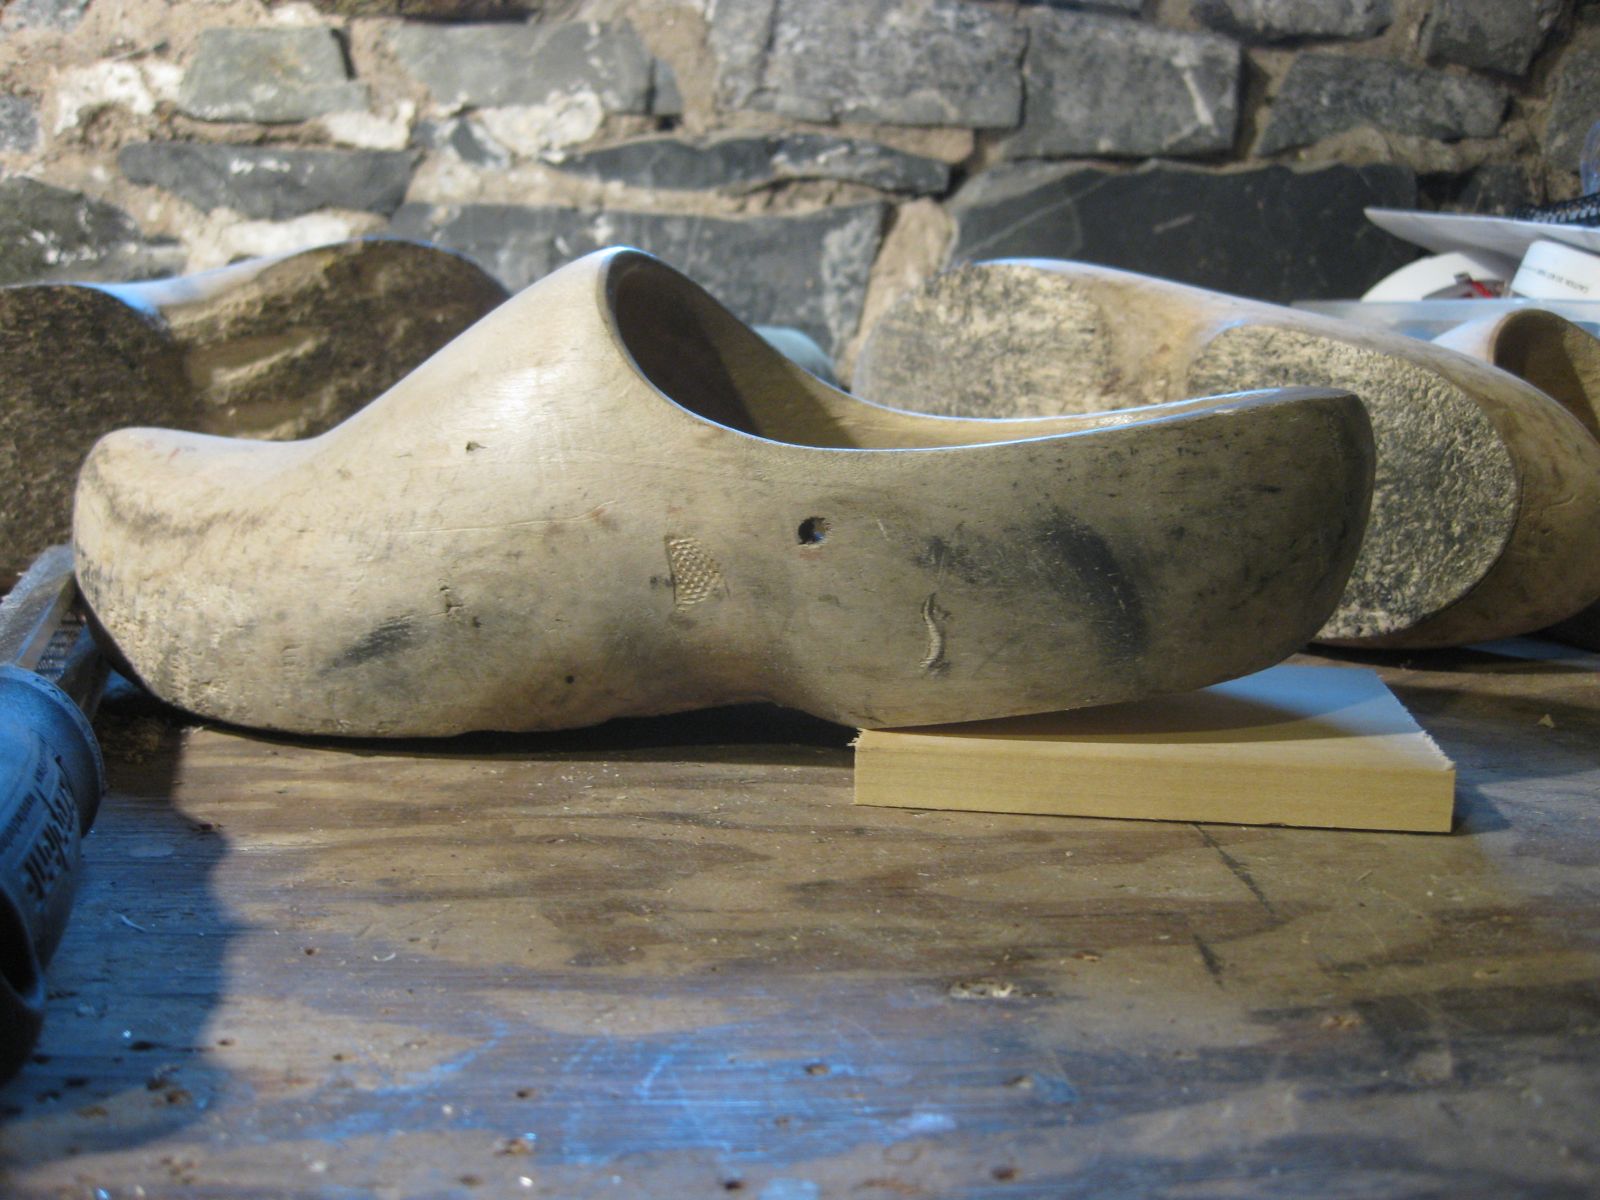
First, clean up the shoe to receive the new piece. I wire brushed and sanded, then used a rough bench plane.


Cutting out the new pieces.


Ready to epoxy.


Sticking them on and filling the gaps from the sides.


Ready for final sanding.


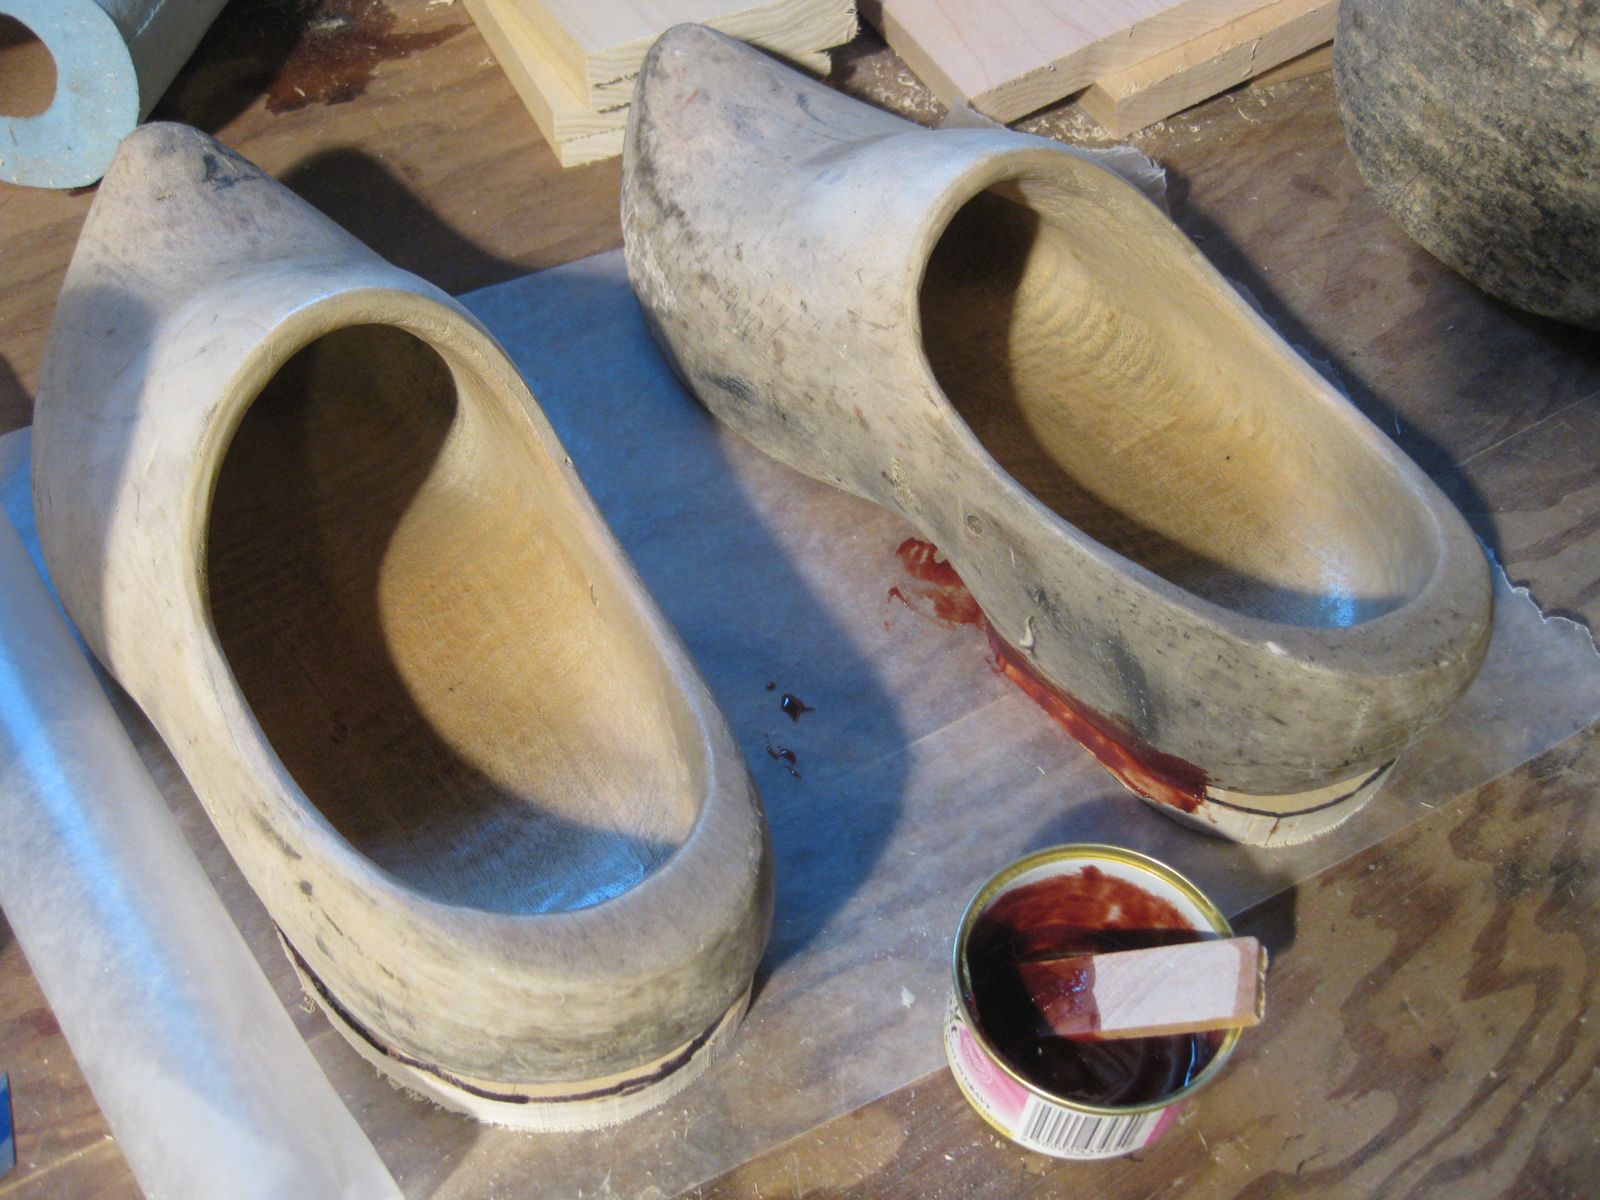
After a reheeling and a lot more wear, this same set of wood shoes wore all the way through in the front section on the bottom.  By this time, they needed new heels again too. I used some scraps of spanish cedar to build them up again.


Below is a look into the right shoe; notice the light coming through the crack in front and the bottom.


 Shaping some spanish cedar chunks.


Front and back additions for both shoes.


First some cleaning up though.


Trimming the extra off the bottom pieces, after the glue has set.


Epoxy on some toe pieces and wedges for the big gaps between shoe and bottom additions.


The Waterlox on the right was not put on the shoes; it was used on the drum that was going on at the same time.


After final trimming and sanding.


You can see the remnants of previous reheeling operations above the spanish cedar pieces.


Ready to go another round. Second pair that needs new heels shown on the right.


I should also mention that level 0 of wood shoe renovation is just sanding it down, which is akin to shining the shoes. They do tend to get dirty and marked up. Maybe less so if they are finished rather than raw wood. But 10 minutes with a palm sander and they look great again.


July 10, 2014

Spanish Cedar doll beds, to furnish tiny apartments


The kids made some row houses with Becky from cardboard boxes for their little animal figurines. They pasted on some pattern paper for wall paper, and cut out some pictures from magazines for decorations.


My mom made some tables for these houses using popsicle sticks and mailed them to us.


Everyone wanted beds for the figures too, so we rounded up some scraps of spanish cedar which I originally bought to make storm doors (still in process, more than a year later, arrg!). The offcuts I used to resole a pair of wood shoes, and the scraps from that were plenty to make these beds from.

The kids did some of the cutting with the japanese saw.


Then a little glue and some headless nails from my Grex air pinner. They did a bit of sanding and put shellac on.

Child 3's bed we left in natural finish, Child 1 put a dark stain on hers, and Child 2 painted hers white.


We chopped up some felt I had for mattresses, and I sewed some thinner felt into pillows stuffed with wool fiber.


Child 1 wanted a dark red felt blanket, so we cut one out.


Child 2 wanted to use some quilting fabric scraps, so we sewed up a two sided cover with the handcrank machine. I made Child 3s's blanket from felt and appliqued a B on it.

The fairy chairs we made are still hanging around and are of the right scale to fit in the rooms.

Child 1 also used some polymer clay to make food for the tables,


 and a toilet for the attic (??).


Drum Building with Deerhide


This spring, Becky ran a once a week native american club at the Somerville Growing Center for the kids and some other local homeschoolers. They did a number of neat things, one of which was making some hand drums from deerhide.


Becky bought these drum kits from Centralia Fur and Hide. Here she is putting together a test one with the kids the weekend before the class. The deerhide head and rawhide lacing was soaked overnight in the tub. Their frames were laminated maple hoops.


Stretching the part that goes over the edge of the hoop.


Cutting the lacing.


Lacing and tightening.


Making a drum beater.


These turned out very nicely and everyone was pleased with them.

Meanwhile, my chinese class was practicing a little routine for the graduation assembly. Last year, I started taking the girls to TCLS on sunday afternoons. I found out they also had an adult class, so I joined it, to brush up and advance my own chinese. I took chinese in college, and spent a wonderful summer on the mainland in 1995. But it has been a long time and my skills have steadily degraded. Attending the adult class at TCLS has been a lot of fun and has definitely had a positive impact on my language skills.

For our assembly skit, my classmates and our teacher came up with the brilliant idea of interspersing chinese tongue twisters (繞口令) with the chorus from this awesome song:


My tongue twister concerned a pole wishing to tie on a bench:
扁擔寬 板凳長 扁擔想綁在板凳上 板凳不讓扁擔綁在板凳上 扁擔偏要綁在板凳上 板凳偏偏不讓扁擔綁在那     板凳上 到底扁擔寬 還是板凳長
Anyhow, the real band has two guys on guitar and one on a djembe style drum. Luckily we had coerced one of the class members to dust off his guitar and learn the chords to the song. I felt it might be nice to have a bit of drums in there too. But I needed one which I could tuck under my arm and play two handed. The kids' recently made drums could only really be played one handed.

In typical fashion, I foolishly imagined I could whip up a longer drum shell relatively quickly, stretch a deer hide on, and have it ready to use for the assembly skit. Of course it took longer than I thought, but all in all we probably only spent about 8 hours on it, and I am pleased with the result.

I had built a pretty nice drum with some friends in college; it was tapered, which gives you more options for tensioning the head. That drum was made of alternating light maple and purpleheart staves, with a goatskin head. So I was not completely new to the concepts involved. Anyone happen to have a picture of that drum? I can't find one.

So I ordered a piece of hide and some lacing from Centralia. While the hide was en route, the kids and I picked out a couple pieces of red cedar


from the big pile I have sitting in my basement waiting to turn into a fence.


We chose some dark and some light pieces, to make the shell a little more interesting. The great things about clear cedar are that it is nice and lightweight, looks good, is very easy to work, and smells great during fabrication. The cons are that it takes a ding easier than chocolate mousse, and isn't as strong as hardwood. I've read that drum shells made from cedar are not particularly good sounding. But that is what I have sitting around, and making things with it is faster and more kid friendly than using hardwood.

For expediency, I made a non-tapered shell, with the help of this handy online calculator. I used a magnetic angle gauge to set the angle on the tablesaw, and set the width to make two staves from the 1x4 (19x89mm) boards.


We used blue tape to help test fit up the shell, and found that we needed some adjustment on the angle.


So I retrimmed them on the tablesaw, and we taped up the whole thing with masking tape.


Next, we cut apart the tape jacket along one joint. Meanwhile, Child 2 tried crushing various objects in the vise.


The girls spread glue in the exposed joints.


The mat of staves was rewrapped, then tied tightly with nylon string and more tape. It was left overnight to dry. We unwrapped it a day or two later and prepared for further work.


Child 2 and I used a jack plane to take down the corners all around. She used the blue tape we took off for a temporary skirt.


This plane is cast iron and far too heavy for her, but she enjoyed taking some shavings off for a spell.


She also loved frolicking in all the lovely spicy smelling shavings.


I rather liked the hand planing marks, so I didn't sand much after the planing.


 The shell ended up looking too long, so I cut some off. The cutoff is probably long enough to be turned into another drum sometime.

The router table was used to fillet the top edge where the head was to wrap around. I wasn't sure exactly what I wanted to do for tensioning, but I decided to try a crisscross scheme with the laces being anchored by castellated cuts at the bottom. One bottom notch per stave was made by first drilling, then cutting with a japanese saw, cleanup with a chisel, and finally some sanding.

I put on a couple coats of Waterlox oil finish during the week. Two days after the second coat, I put on a coat of furniture wax.


The hide and lacing were soaked during the day while I was at work.


I had marked up where I wanted holes with pencil on the back of the hide before soaking.


Stretching the hide. Incidentally, this obliterated my marks on the back. Oops.


Poking the lacing holes. Man, wet hide is surprisingly strong!


Ready to lace.


I worked out a scheme to catch two points on the perimeter of the hide with one cut piece of lacing, tied at the bottom between castellations.


 I gradually worked my way around, while lightly tensioning each one.


After I got them all in place I went around and tied them all tighter, to increase tension.


I wanted a kind of deep sound from this drum, so I didn't pull as tight as we did on the kids' hand drums. In retrospect I should have pulled it tighter. As summer humidity has set in, the drum has been sounding deader.

Added an extra strip of hide to clean up the look of the edge of the hide where the lacing went through. This may have been a mistake, I don't know, does it look cleaner or just kind of clumsy?


Some yarn was used to increase tension after I was done tying all the laces. Later I cut this off, but then changed my mind again and put it back on with jute twine.


After a day of drying, it sounded nice!


I laced on a wide ribbon strap to hang from my shoulder.


Here is Child 1 trying it out.


I had it ready by the week before the performance, so we had a chance to practice with the drum. No one told me it sounded terrible, so I brought it for the performance. I'm not a great drum player, but I think it added to the overall effect.


A video was taken, but I can't receive videos on my old fashioned phone, so I can't post it here. Here is a still picture though. While we can't compare to the guys in the video, I think it came off pretty well!