

I have always loved to eat pies, and in my opinion there is really nothing that can best a well done home made pie. It seems a simple food, and indeed is possessed of a far more rustic appearance and flavor than a fancy cake, but an excellent pie demands a significant amount of time, loving effort, and basic skill to execute. Cake presents a refined product of sugar, dairy, kitchen chemistry, aesthetic whimsy, and strict adherence to a prescribed process. Pie on the other hand is a celebration of fruit, complemented and enhanced by its raiment of basic pastry, and involves relatively more art in the technique of preparation.
In this post I'll provide a snapshot of my current state of the art on fruit pie making, as of late July 2012. These two pies were made to bring to a summer party for my office, graciously hosted by the Sachs family at their beach cottage in Westport, MA. They turned out nicely, and were well received by the guests.
Something about pie makes it difficult to do well in a commercial setting. So this is an area where investing time developing skill as a home baker can pay tremendous dividends. There are only two problems with 99% of commercially produced pie: one is the crust, the other is the filling! Crusts are short on flavor and have the texture of cardboard and fillings are gluey and excessively sweet. I have tasted vanishingly few commercially made pies that are worth eating. Because I love pie so dearly, I don't bother ordering it at restaurants or buying it at a bakery. Instead, I make it at home.
When I was about 17, one summer I went to visit my mother (living in North Carolina at the time) and my grandmother (living near New York) and asked them to teach me how to make their pies. They were happy to oblige, and I have been making pies ever since. I've gradually improved my skills since then, changing around the tools and techniques to suit my own take on the subject, and can now make a good pie in less time than I could in the past. I certainly won't claim I am among the world's best pie makers or anything, and there are many styles of pie and variations on ingredients to please differing tastes. But I can competently make the kind of pie that I myself love to eat, which is a very fine state of being that I wish everyone could enjoy.
My favorite cookbook for pies is The Pie and Pastry Bible, by Rose Levy Berenbaum. This is my go to source as a starting point for techniques and ingredients, and if you don't have a copy I highly recommend getting one. I bought mine used from Amazon for something under $10. The sweetness level and thickener ratios set out in the recipes in the book agree with my own taste, so I've come to trust its recommendations. Rose also has blog which is interesting to read sometimes, and hosts high quality forums, which are a great place to ask questions and admire the work of other bakers.

Pie is a labor of love; I think the popular perception is that "easy as pie" applies, but it takes me 2-3 hours to make one. Is it really worth it? Absolutely!
Crust
The basic ingredients in a crust are flour, fat, salt, and water.
For my fat, I like to use 3 parts butter to 1 part lard or shortening. Butter gives the crust a great flavor, while lard (or to a lesser extent, shortening) imparts a more flaky texture. This crust is mostly along the lines of the Deluxe Flaky Pie Crust from Rose's book, though it owes some parts to the flaky pie crust recipe from Gourmet Cookbook, which was my previous default crust guide. For these crusts I used the cultured home churned butter and home rendered leaf lard we made the week before.
- 320g all purpose or pastry flour
- 5g sea salt
- 5g baking powder
- 150g unsalted butter, cut into ~1cm cubes
- 50g lard or shortening, cut into ~1cm cubes
- 1 tablespoon buttermilk
- 110g ice water (or a little more if no buttermilk is used)
The slight acidity of the buttermilk and the addition of a little baking powder make the crust more tender.
I usually make up a few crusts at once and freeze the surplus ones, so I measure out the dry ingredients into multiple tupperwares. Put the measured dry ingredients and the cut fat in the freezer for at least 30 minutes. I measure the water into small tupperwares and put these in the fridge to chill while the other ingredients are freezing.

When the ingredients are cold, pour the dry mix into the food processor set up with the metal blade and pulse for a few seconds to blend the components. Next, add the fats and process in bursts until the largest chunks of fat are ~5-8mm. Now add the buttermilk and almost all the water, then process in short bursts to incorporate the liquid. If it doesn't seem like its going to hold together, add the rest of the water and process a little more. The mixture should not be glomming together at this point, but if you press it together with your fingers, it should feel as though it could hold together as pie dough.
Now quickly invert the processor bowl onto the counter and remove the bowl and blade. One good thing about doing several crusts at once is that you only need to clean the processor at the end, thus amortizing the cleaning effort over more crusts.

For the first probably 6 years of pie making, I did the mixing and
watering by hand . But it is more time consuming and I think it actually
does not do as good a job of producing the right texture and
distribution of ingredients with minimal working of the gluten in the
flour. Plus, making a pie already takes me so long that I don't do it
nearly enough! So I've reconciled myself to the usefulness of the food
processor.
Gather up the collection of granules and nuggets with a dough scraper and rake it out into a ~30cm square area. With the heel of your hand in short strokes, press and smear the entire layer until most of it is compacted to a rough sheet. This is called fraisage, and it helps to start the fat pieces flattening out to become the layered structure needed for flakiness, as well as helping to form up the dough for further operations. I probably don't do it quite right, but it turns out well so I keep at it. There are plenty of videos you can watch online, but if you don't do the fraisage at all it still turns out well, so don't sweat it too much.

Now use the dough scraper to excavate chunks of the collapsed mixture and stack it up into a pile. Press on the top with one hand, while gathering and pressing stray pieces into the mass from the side with the dough scraper in the other hand. Form the dough into a shape like a little flat topped cake, then scoop it up and put in on a piece of plastic wrap.

Cover with another piece of plastic wrap and roll out a bit, then fold into thirds.


Recover with plastic wrap, roll a little more, then fold into thirds the other way. This folding helps to multiply and thin the high and low fat laminations in the dough, which will later lead to increased flakiness. Its the same effect used to make puff pastry, but less organized and implemented less completely.


Of course at any time if the fat starts melting to any significant
degree things are getting too warm and you should wrap up the lot in
plastic and let it chill in the fridge. The ideal composition of flaky
pastry is to have the fat and the moistened flour remain in completely
different phases, but thinned and interspersed in a laminated structure.
If the fat gets too warm, it will just penetrate the flour phase and
you will get a greasy, tough result.
After the second folding into thirds, cover the dough in plastic wrap and let it rest in the fridge for at least an hour, preferably overnight. This allows the gluten to relax and prevents the crust from from getting tough.
After the second folding into thirds, cover the dough in plastic wrap and let it rest in the fridge for at least an hour, preferably overnight. This allows the gluten to relax and prevents the crust from from getting tough.

Take the dough out of the fridge, divide it in two, sandwich each half in two sheets of plastic wrap, and smoosh it down into a disc. Return one to the fridge while the other gets rolled out. This is the point at which I freeze crusts that I don't need right away. If you roll it out in the plastic wrap to about 150mm diameter, it will defrost faster on the counter when you take it out to use it at a later date.

I like to do the rolling in several stages. First I roll it out to fill a
single width of plastic wrap, then return it to the fridge and roll the
other half to the same level (or all the halves if I'm doing multiple
crusts).

Then on the next round, I peel the wrap, offset it and replace it, while adding another length of wrap next to it, thus creating a wider expanse of plastic wrap to accommodate the growing sheet of pastry. I roll this out to about 3/4 the diameter I need, then return to the fridge and run the other pieces to the same level. Then I finally roll it out to the full diameter and return to the fridge until needed.
One quirk of plastic wrap is that it sticks to the pastry and moves with it. So when you are rolling out the dough, the plastic wrap has to stretch. Some brands of plastic wrap split easily without much stretch at all. Saran brand works about as well as anything I have used, but it is still necessary have to periodically peel the wrap off and reapply it to allow the wrap to contract before another bout of stretching. Another effect is that after some initially easy rolling, it becomes difficult to grow the diameter any more. In this case, the plastic wrap is acting as a tensile reinforcement to the crust and not letting it elongate as you expect it to. Just peel the wrap and put it back on, then continue rolling.
I do feel like using plastic wrap is sub-optimal. If I could easily do without it, I would. For many years, I just used a floured surface or a pastry cloth, with a pastry cover on the rolling pin. This was prone to sticking problems if not done perfectly, and did result in more flour being added to the pastry, which contributes to toughness. For a few years I used a pie sack (a round plastic sack with a zipper around its circumference), but this was just too cheesy, and I hated washing it anyway. The plastic wrap method doesn't need any extra flour, is easy to do, and is fairly forgiving of process variations. In an ideal world I would be hardcore enough to do without and yet still be able to whip out quality crust in the same amount of time, but for now I'm willing to continue being the sort of person who uses saran wrap.
Filling
Peach & Blueberry
- 1000g fresh peaches, skins and pits removed
- 550g fresh blueberries
- 200g sugar
- juice from half a lemon
- 3.5 Tablespoons cornstarch
I picked up a sack of peaches and a few pints of blueberries from the Stillman's Farm stand at the Lexington farmers market on the way home from work. The peaches were blanched in boiling water for a couple minutes, then allowed to cool in a strainer. Later, the skins were taken off, pits removed, and fruit cut into pie suitable chunks. I put the resulting bucket of peaches and juice in a big tupperware and dumped in a pint of blueberries. All told, I had 1550g of fruit. I thought this might be a bit too much to fit in a pie, but decided to make it into filling anyway and possibly make the extra into a little dumpling or turnover with the crust scraps.
Using the well organized chart of fruit pie sugar and thickener amounts in Rose's book, it looked like I had about one recipe worth of peaches and one recipe worth of blueberries. So I used the combined thickener and sugar amounts from the two separate recipes.
First I added the sugar and the juice from half a lemon. After mixing well with a wooden spoon, I let the mixture macerate on the counter while I did other stuff for about 1 hour. I poured the mixture into a strainer and let it drain for about 15 minutes into a small pot.
Then I simmered down the poured off juices until they were pretty thick and syrupy. I find that when the mixture grows a good head of foam it is close to being done. The syrup was poured back over the drained fruit, mixed well, then the cornstarch was added and again the filling was mixed until the cornstarch was fully blended in. The tupperware then went back in the fridge until pie assembly.
The concept of draining and thickening the juices is entirely attributable to the Pie and Pastry Bible. It does take some extra time, but I like how it turns out. Not necessary for all fillings, but peach is one that certainly begs for this treatment, and I use it on apple pies as well.
Bluebarb (rhubarb & blueberry)
- 1L canned garden rhubarb, lightly sugared
- 1 pint blueberries
- juice from half a lemon
- 100g sugar
- 3.5 Tablespoons cornstarch
The standard way to do rhubarb in a pie is with strawberry of course, but I must admit I'm not such a huge fan of the combination. I think strawberries are better eaten fresh, and I just don't find the flavor combination as great as most people seem to. So I prefer to use rhubarb by itself or in concert with blueberries.
I had a quart jar of rhubarb that my mom had canned from her garden a few years back that had gone unused during the year that we were vegan since we were trying to not eat much sugar. Now was its time to shine! She had canned it with some addition of sugar, and it tasted fairly balanced, so I decided not to add any extra sugar on account of the rhubarb. I did put in 100g to take care of the blueberries, then added the cornstarch and a 1.5 pints of fresh wild blueberries from Whole Foods (the extra ones I had bought at the farmers market had been eaten in the meantime).
This filling went into the fridge until assembly.
Pie Assembly
These two pies were put into pyrex dishes, which were chilled in the fridge and sprayed with flour/oil before assembly.
The bottom crust was take out of the fridge, the plastic peeled from one side and replaced (this helps it release easier later), then peeled from the other side. Another nice thing about plastic wrap is that is makes for easier handling of the rolled dough when assembling the layers.

The bottom crust was dropped and distributed into the pan, then the second layer of plastic peeled. After settling it in, the edges were trimmed with kitchen shears.


Now the filling was dumped in. The entire filling for the peach one
actually fit, barely. The bluebarb was a little low so I dumped some
more blueberries on top and sprinkled a little more sugar.

Next, the top crust was prepped in the same was as the bottom, and the plastic wrap was used to assist in applying and positioning the top crust. The plastic was peeled and the edges trimmed.


To seal the two layers together, I usually lift the bottom crust edge off the edge of the pan a little, press the top and bottom edges together lightly, then fold the adhered layers over and under. The folded edge is pressed down against the edge of the dish. After doing this all the way around, I use my thumb and forefinger to press in a fluted edge. With the mostly butter crust this detail is lost during baking but I am compelled to do it anyhow.
Now for venting and decorating. I like to cut a hole in center and put 5 or 6 vents in radially. I use 5 on an apple pie since an apple sectioned at its meridian possesses five fold radial symmetry. On others I use 6 vents.
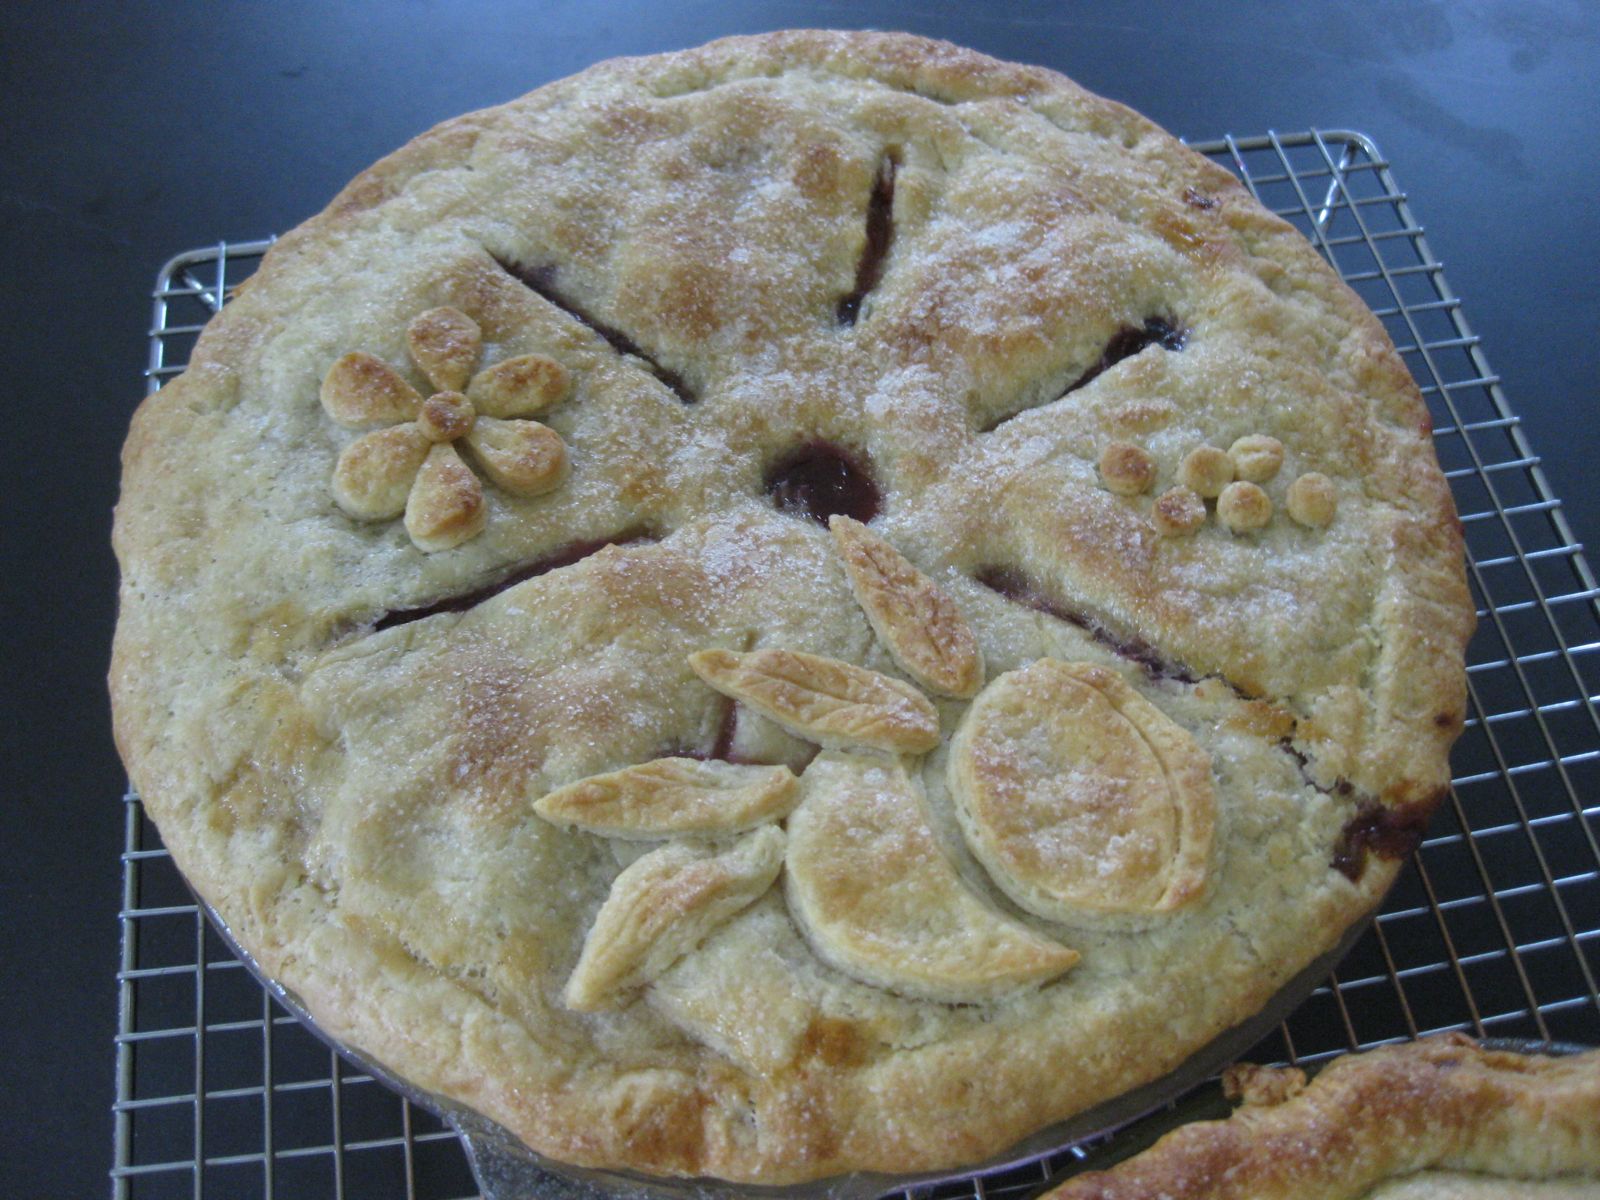
The crust scraps are sandwiched between plastic wrap, rolled out a bit, then used to make topside decorations. My usual decoration is leaves, but I this time I used the adornments to communicate some information about each pie.
The bluebarb pie had two stalks of rhubarb, a few circles to act as blueberries, and a cute pig's face to show that the crust contained lard.

On the peach blueberry pie, I made some peaches with leaves, blueberries, and a flower to denote vegetable shortening.

As a final touch, I like to sprinkle a little sugar on the top. This gives the texture more depth, and makes you think about sweet things when you look at the cooked pie.
Baking
All baking was done at 215C (425F). To aid in baking the bottom crust properly, I put my baking stone lined with foil on the bottom of the over before preheating. The pies were put directly on the stone for 20 minutes, then moved to a rack for about another 40 minutes. I put foil beneath the pies to catch drips since they were very full. The bluebarb contained itself well, and the peach blueberry dripped a modest amount of juice which was easily contained.
When baking solely at high temp, I find that I need to shield the crust every time, especially the edges. I have a crust shield for edges that drops on from the top, but it doesn't fit some of my pie pans. Foil can be used hear with only a little annoyance to form it around the edges without disturbing the crust. I think the best results are had from putting the pie in unshielded and letting the crust set, then putting shields on for the remainder of the baking. Only problem with that approach is that it is more difficult to put the shields on a burning hot pie on a rack in a hot oven. If the center of the top crust is getting too brown, it can be tented with foil with vents cut in it. It is crucial to allow steam to escape.

The pie is done when the juices are thickly bubbling in all the vents, or the juices at least appear thickened when sampled with a knife.

Check out the flakiness of the butter/lard crust!

Millie samples the drippings from the peach blueberry pie.
Presentation
These pies were going to a party, so I spent some time making little signs for them. We also brought along a jar of home made creme fraiche for spooning on top of the pies. I rigged up a bracing system involving tape slings and cookie sheets to transport the pies in the car, and they were still slightly warm when they were cut into at the party.


Ah, pie. You are so, so wonderful.
3 comments:
Your would love using a Sil-Pat and a Demarle at Home Roul-Pat when you make pie crust (as well as a lot of other doughs). They make the process much, much easier.
Also, I'm wondering if you would please consider removing word verification from your blog? A lot of people just give up after they've made repeated attempts to interpret and enter often-illegible letters and numbers (which I may do if I'm asked to enter them a fourth time).
Hmm, I have a couple Silpats at home that I use for lining cookie sheets. Have not tried using them for pie crust; I'll have to look into that...
I just turned off the word verification, my apologies for the inconvenience! No reason to have it unless I start getting a lot of spam comments.
Yes, the blueberry rhubarb pie shown above was made with the 3 butter : 1 leaf lard. That's why it has a little pig face decorating the top :)
The one with the lard was much flakier than the one made with vegetable shortening, as you can see in the closeup pic of the edge of the crusts after baking.
Post a Comment