

Last year when we did our backyard renovation, I put a lot of energy (and cost) into the back fence. We are planning to espalier apple trees against the fence, and the 10-20 year life expectancy of even a pressure treated fence post did not seem compatible with this idea. Replacing an in ground 2.4m post with apples grown all onto the fence sounds difficult and probably damaging to the trees. Dwarf apple trees might last 50 years, so I began thinking about how to build a fence that would have a comparable life span, or at least make replacement of fence elements less disruptive.
Post Design
The life limiting factor on a cedar fence is the posts. Using pressure treated posts is not appealing given that they are filled with poison and the whole point of the project is to grow food in the soil around them. In any case, they still don't last all that long.
First I looked into non-toxic treated lumber. Probably I am at a disadvantage because I don't have a good relationship with a lumberyard. In many cased I received no response from the local distributors listed for these products; maybe they are not interested in small time jobs. From the scarcity and price (when I could even get a number), I can only assume there is not much interest in the northeast in a long life, low toxicity fence system. Seems weird that I am the only one interested in that?
One product in this category is thermally modified wood. This process heats the wood up to about 200C in a low oxygen environment such that chemical changes occur which make the wood less digestible to microbes. Strength is decreased, among other changes. I could not find a manufacturer of these products which would recommend use as in ground posts, or an estimate of their soil contact life expectancy.
Another low toxicity process is treating the lumber with sodium silicate followed by a thermal step, promoted by a company called Timbersil. This looked interesting to me, but I could not get any response from Hood Distribution or Rex Lumber.
There is a process which treats the wood with a furan compound and heat, which is supposedly low-toxicity. This product is called Kebony, but again I could get no one to talk to me about buying it.
I also looked at a treated wood product called Accoya which uses acetic anhydride to modify the wood. I made a couple inquiries, including at a mill in Canada, and did eventually receive pricing from a place in Florida. The manufacturer sells the wood in rough form, so it has to be milled from bulk shapes to what you want. It looked promising, but when I finally got a price it became less interesting. Each 6x6 post (which I would have to make from two 3x6s as that is the biggest they sold) would have cost $320. The lead time was going to be long, expensive shipping of long pieces from Florida, and so on.
Walpole Woodworkers has a fence post system based on concrete piers with wood on top called Lifeguard which looks like a good idea. The wood is not actually in the soil, so it is much less subject to decay and also relatively easier to replace should that become necessary. I had Walpole quote the entire fence with the installed Lifeguard bases, and it came in at more than $34K, which was not going to work for us. They said they would not be interested in doing just the posts.
But the Lifeguard design got me thinking about either using concrete posts, or at least concrete in-ground piers with wood posts on top. I found an outfit called PermaColumn that makes precast high strength concrete piers with steel brackets on top welded into the rebar in the post. I got a quote from a lumberyard which stocked these in MA, and eventually had them delivered to my house for about $100 each. The landscaper said maybe we could just make them, or make full posts from concrete. But for $100 each including delivery, it seemed like a good idea to just buy them.
Fence Panels
The fence itself is eastern white cedar, made by a local fence company. They milled the posts custom so they would fit in the brackets on top of the piers. The cedar should last a good long time, not being in ground contact, and replacing things won't be so terrible should that need to happen. The panels are solid privacy style fence. Behind this fence is a strip of earth, then a rusty chain link fence and a parking lot. I did not want to see the chain link or the parking lot, and I thought a solid panel would lead to less problems with maple seedlings and vines coming through the fence from the no man's land strip of dirt between the two fences. In retrospect, maybe the louvered panel would have been ok, since I have to go back there once a year and cut down tree seedlings anyway. And a louvered panel presents less wind load on the posts.
Another aspect obvious in hindsight (there are a few of them on this project!), is that the panels were made in 2.4m sections, and the odd size that was cut down to fit the space was put all the way on the east edge. This makes the center section look funny because the whole back garden is highly symmetric with a strong central axis made up of steps, a path, and a big granite block. So the fence posts for the center panel are too far to the right, which looks weird. We didn't notice this until the posts were already set though, and when I suggested to Tom (the landscaper) that maybe they could be repositioned, he looked like he was going to murder me. As the fence silvers to gray and the apple trees grow in, this asymmetry will become less glaring.
Post Installation

The landscaping crew did a great job getting the piers set in place and leveled.

It was not an easy task since the fence line ran pretty much right over the old one, which had a few partial sections of concrete ledge and old post footings. So they had to cut a couple of the piers a bit shorter than they came with a concrete saw. In general, they were good sports about trying to do this section of fence in my strange and labor intensive way rather than the way they usually do it.

I bought a bunch of hardware from McMaster to bolt the posts to the brackets per manufacturer's spec. On the day when we did that though, I quickly found out that the piers I thought I bought were not the ones delivered. Of course I should have noticed sooner, but at this point they were set in concrete and buried, after much wrangling and arduous labor by the landscapers. So they were certainly not coming out. The issue was that the steel brackets on top were 3mm or thinner metal, which is the product designed for decks to be built upon.

The ones I wanted to use had more extensive 6.3mm steel brackets on top.
Lacking any reasonable alternative, we just went for it and put the fence up.
Fence Install, Round One
The fence was put up, and the area around the piers backfilled.

Fail
After a windy weekend, it was clear this was not going to work out.

Drat.

I came up with a remediation plan which would cost a bunch of extra money be annoying to implement, but which would hopefully fix the problem. My solution was to make 6.3mm aluminum braces on the front and backs of each post which would bridge the concrete and wood and be securely through bolted to both.
The aluminum came from OnlineMetals, one of my favorite sources for this kind of thing. I used flat plate in the front, but U channel in back to lend some extra stiffness.

It would have been better to use steel from a strength perspective, but I just was not up for the metal working aspect of that. Longer braces would also have been better, but I was trying to economize on extra cash outlay and not make the installation too difficult.
The stock was chopped.

Using my favorite aluminum cutting blade, the Alumi-cut from Tenryu.

Then marked with a jig.

drilled.

Sanded lightly and deburred.
A template was prepared which would guide a drill bit to make straight (ish) holes through the wood andconcrete.

My little dewalt hammer drill was not up to blasting large diameter holes quickly through a total distance of 2.2m in high strength concrete. So I got a Bosch SDS from Amazon and some quality carbide masonry bits.

The SDS did an absolutely amazing job drilling the concrete. Previously I thought the most tedious part of the remediation project was going to be drilling all that concrete, but in fact that was a complete non-issue with the new tools. Only problem was hitting rebar on a couple holes, and spalling out the back of the post as the bit finished its work.
Fence Install, Round 2
I negotiated an extra 2 man days of work with the landscapers from the two guys who had done the most on the project already, for an add on fee.
We took the fence down again.

Thomas and Alberto thought I was crazy for doing this, and at least one pedestrian walking by heckled us: "Why you taking that down now?! You just put it up!". I yelled back that we didn't have enough fun doing it the first time, so we were having another go.
The top of the fence was trimmed slightly (~15cm), since it did seem outlandishly tall, and this would cut the wind load a little bit, which after doing some calculations I was starting to get concerned about. Suffice to say if we have hurricane force winds, I still think this fence is toast. But short of that it should hopefully be ok.

The earth was dug out in front and back of each pier.

I clamped my jig onto the pier and drilled the concrete
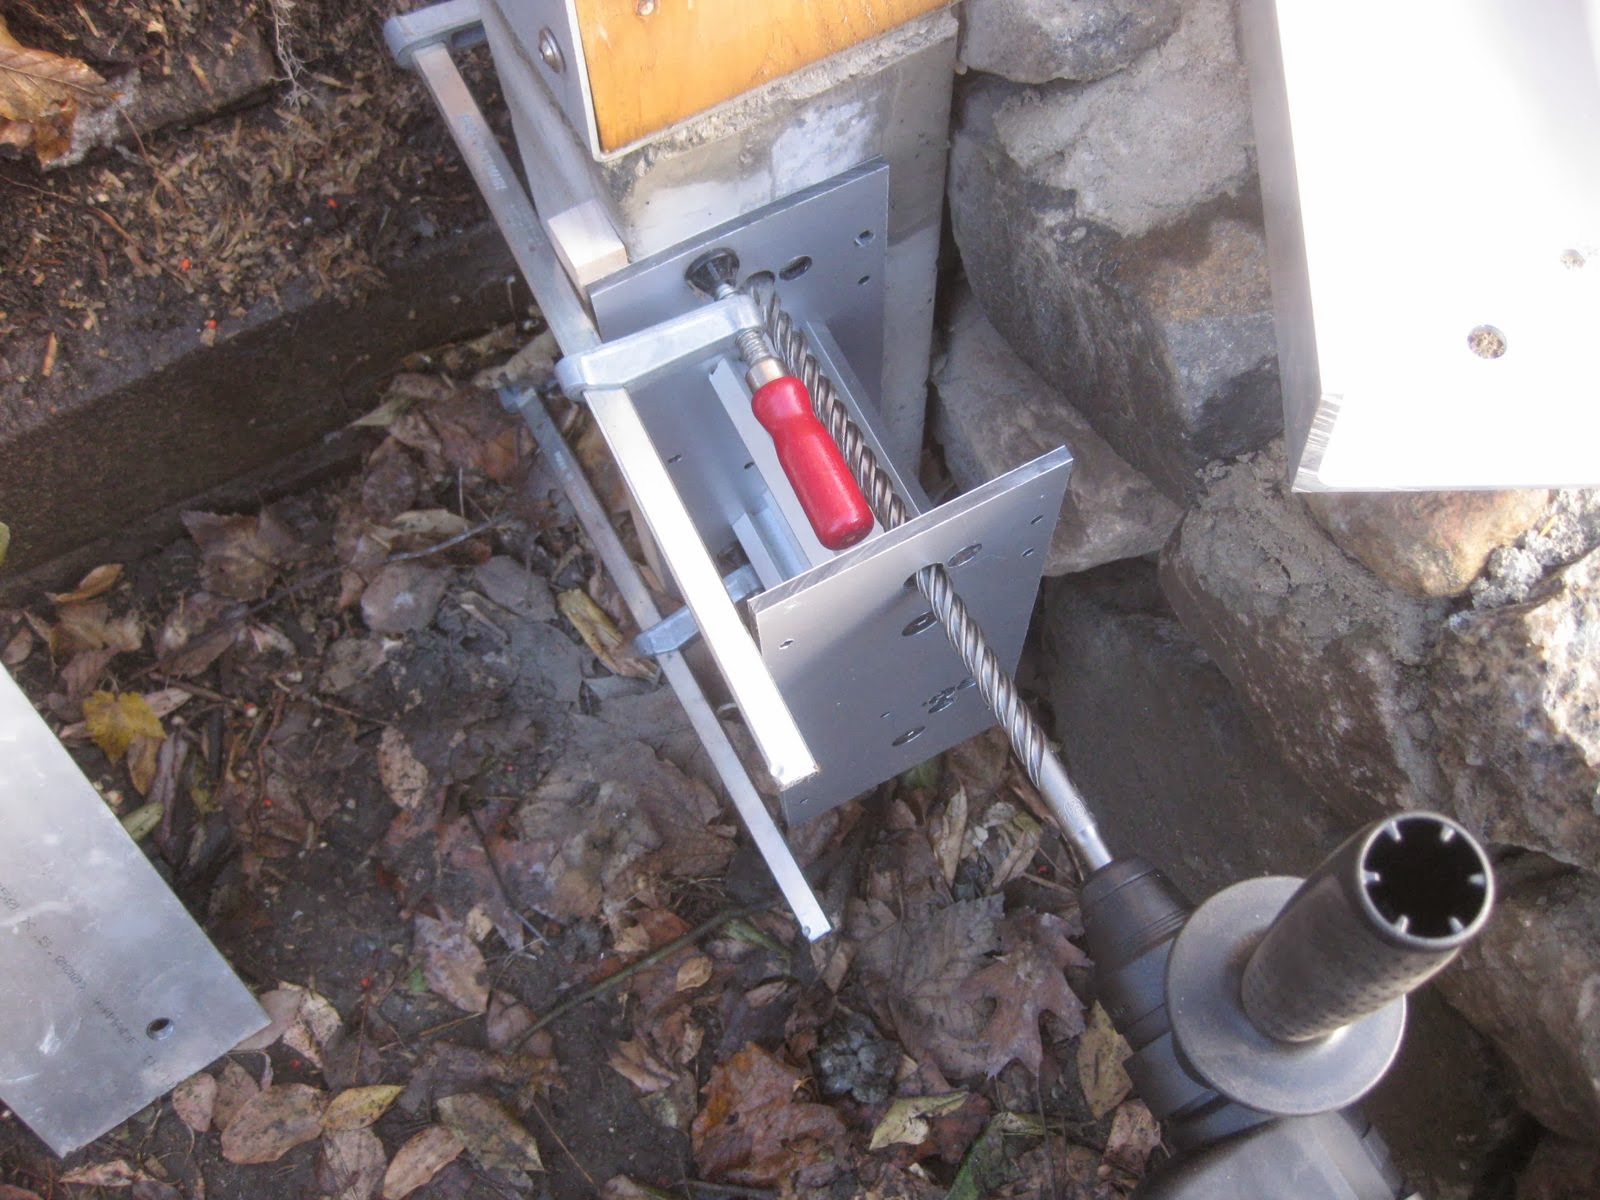
and the post (used the jacobs chuck adapter for the bosch for this, with hammer mode off and a self feed bit)

Stainless bolts were put in and tightened up.

Later I realized I should have used anti-sieze on the nuts!

Oh well, they can be broken or cut off and replaced should the need arise. Used it on the last set of bolts anyway.
I also put in a couple stainless lag screws into the wood section of the front plate braces.
Early in the day, my holes were relatively straight. This meant the back side bracket could be positioned on the bolts coming through from the front with only slightly oversize holes. As the day wore on and we worked into the dark, the drilling got more sloppy and I ended up having to open up the backside holes quite a bit. Probably would have been better to leave the drilling of the backside bracket until it was marked for each post, rather than doing them ahead of time.
We worked in sections, putting up a section of fence along with the next post and its braces.

After the post and braces were on, the soil was backfilled.
We put a bunch of extra rocks and brick scraps behind the fence to try to discourage new trees and vines from growing there. Stumps were cut out too, to make it somewhat accessible with help from a ladder, for occasional maintenance from the rear and a yearly vegetation cut back.

Finally I installed some temporary braces to hold the end posts of the back fence until I have a chance to finish the side fences.

Yeah, for me "temporary" can mean multiple years; it is already over a year since I put those braces on. But I did just start putting up the side fences, so I think by this time next year it will be done.
So we'll see how this getup fares. Are the piers strong enough? The posts? The connections? One of the posts is splitting; will that compromise the fence? Bi-metallic corrosion of the stainless and aluminum... Time will tell.

2 comments:
We went through something similar (but much less tooled up) building a two story tower fort. Wood search not as detailed, but went to red cedar for cost, best nontoxic option available). When we pulled it down fourteen years later (this year), all was sound except for the join between the wood and the pier structure;it broke cleanly at the rot point at the top of the bolts in the brackets. They were above ground, but stuff does collect over time. It was a rather boggy place, your location looks much better in that regard.
How long will the fence last? For ours, it has until the boundary dispute is over this spring.
Thanks for the comment; nice to hear some real world experience with this post construction. It did cross my mind that the bottom of the post where it sits in the bracket would be better off if it was stood off a bit so it wouldn't sit in collected water on the bracket. But I thought it might weaken the pier to post interface too much not to have it firmly seated in the bracket. Probably should have tried to seal the bottom of the posts with wax or tar or something.
Post a Comment