

I'm still a rank beginner when it comes to straight shaving. But I do like to make things, and I've already made myself a strop, shaving soap, and a brush. So it seems only natural to undertake the fashioning of a razor.
I am anticipating that it will be deeply satisfying to exactingly draw a cold, fantastically sharp piece of steel shaped with my own hands across all the tender parts of my face. A tool made from scratch with care and fine materials, exquisitely suited to the one job it was designed to do.
There is a highly topical sub-forum over at straight razor place called the Forge, which concerns itself with, as it happens, making of razors. Surely the contingent of straight razor users worldwide is quite small. And the subset of this group interested in custom, small scale, or hobby fabrication of razors, whom also speak English must be vanishingly small. But as usual the power of the internet to aggregate far flung people with niche interests is amazing.
To start with, I read a lot of postings on the Forge, along with some of the other documents referenced there. It helps that I have some facility for metal work, and access to some tools at work and at home.
Design
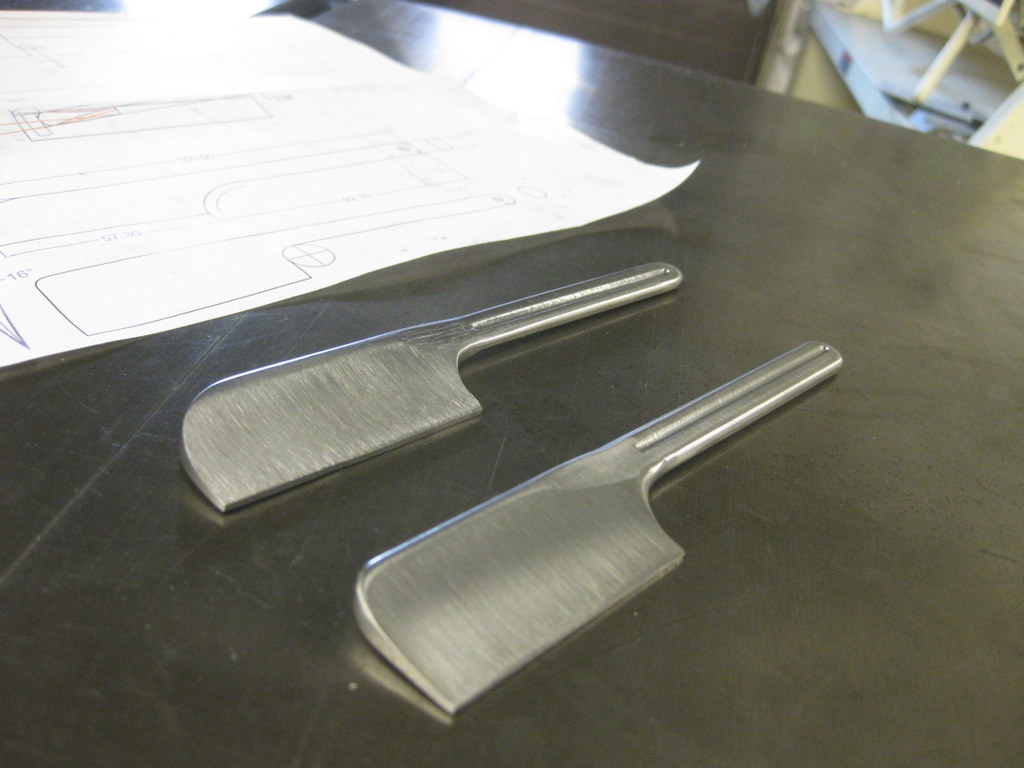
Based on what I read, it seemed like aiming for a blade angle of about 16 degrees would be good. Right now my razor is a kamisori, a type of Japanese straight razor. It is asymmetric, with most of the taper being on one side, and it is intended to be used with one side always on the face. While being a fun challenge, in all I think I would like to explore what symmetry has to offer. So I drew up some designs in autocad.

The dimensions on length and blade width are roughly along the lines of my current kamisori, which is surprisingly ergonomic in shape. Plus the stock I bought, if divided evenly, would give three blades of 150mm length. The ratio of blade to handle I set to be the golden ratio (1:1.618), and I also used this ratio in the handle width to blade width choice. In retrospect I think I might have preferred a little bit shorter blade length and a little longer handle. It turned out looking nice enough though.
For other details, I made one with a more curved tip and handle to blade transition, reminiscent of a japanese vegetable knife. The other one I made a bit more blocky, sort of like a tiny cleaver. I wanted them both to have a character invoking precision surgical instruments, so I chose a linear bare steel handle, to which I added a hole at the end. This later got turned into a groove instead during shop work. They ended up looking more similar than I had planned, and neither one exactly as drawn, but both are reasonably pleasant to look at.
The DXF file for the above is posted here.
Stock
Again based on info gathered on the forum, I opted for O-1 high carbon tool steel for this first effort. It is cheap, (relatively) easy to work in the annealed state, straightforward to harden, and performs well as a blade. Some of the fancy powder metallurgy stainless alloys sounded exciting, but have some particular issues with them and are generally considered a pain to work with. I bought an 18" long piece of O-1 0.250x1" from Jantz for $14.95, which is enough for 3 razors. It seems that heat treating of O-1 has more art to it than modern air hardening steels, so I opted to send my first razors out for heat treat.
When it arrived, I abrasive chop sawed it into three blanks.

Machine Work
With access to a reasonable machine shop, I decided to use a mill and bandsaw to do the bulk of the work, then abrasives to finish up.
To mill the blade angles, I would need to either tilt the head of the mill or tilt the blank. My design showed that the machined surface should be at 6.071 degrees declined from horizontal. The manual mill in the shop at my job is a Bridgeport clone and sees heavy use every day by a wide variety of engineers. Also, the time I have to work on stuff like this comes in usually sub 30 minute chunks either at lunch or occasionally after work on a friday. So I didn't want to pursue a strategy which would involve major setup changes to the mill that would take too much time to set up and too much time to reverse. For instance, I could tilt the mill head and rotate the vise by 90 degrees to get the right geometry to cut the flats. But then I would have to retram the mill head and the vise too. We have a little chinese angle table, but it doesn't fit on the mill table beside the vise, so the vise has to be moved and thus retrammed when replaced. Plus to mill on the angle table I would need to mount a vise to it or make a clamping jig for the blank.
The obvious solution was to create a jig which would hold the blank at the proper angle, and which could be clamped on parallels quickly in the mill vise using its normal setup. I drew up something simple in autocad, and found a suitable chunk of aluminum in the scrap barrel to make it.


I put in two bolt holes in the chunk of metal, which allowed it to be clamped with T bolts to the angle table, plus drilled and tapped the holes for the M4 clamping screws.
The angle table was set to 6.1 degrees using my magnetic angle gauge, since the riveted on scale on the table itself didn't appear too trustworthy.

Then I cut an angled mortise to receive the steel blank.

I thought I would have to make a second jig (or another mortise on the other side of this one) with a secondary angled bed to support the blade section when cutting the second side. Instead I just left an extra 1-2mm of stock on the end of the blank for clamping and support. This worked out fine.
Annealed O-1 is supposed to be only a bit tougher to machine than mild steel. If you are a real machinist, mild steel and even stainless are no big deal, but I've always had a much harder time making steel parts come out nice compared to aluminum. I was prepared to suffer machining tool steel, but it really isn't bad at all. It does seem harder to machine than mild steel, but easier than almost any stainless.
We have a bunch of dull cutters around which work fine for aluminum, but didn't do well on the O-1. So I ordered a Valenite carbide insert end mill off ebay and some inserts to go with it. This cutter does a good job when surface cutting thin layers off working down from the top, but does not do well when cutting in from the side. The cutting edge is totally vertical; probably side cutting would be better with a spiral shape. Maybe I'll get a solid carbide spiral end mill to try next time.
So the indexable mill did the two blade planes. The cutter in the photo is not the one I bought off ebay, but instead one we had at work I tried before buying one of my own. I think these inserts are actually for aluminum, but they worked fine for cutting O-1.

Then I bandsawed out the handle and put it back in the mill to clean up the bandsawed edge. I also used the indexable end mill on the second blade to form the radius between blade and handle, but the cutting was rough going; I think a spiral cutter and perhaps a clamping jig would be better here.
Next I cut down about 1mm from each side of the handle with the insert mill

The ball mill didn't perform very well, maybe next time I'll get a wheel style groove cutter and try that. I also didn't center them too well since I was in a hurry, which was careless.
Final operation on the mill was to use a solid carbide 1/8" corner rounding tool I bought off ebay to round the edges that want to be round like the handle and back of the spine. This cutter was excellent and cut the steel like butter, though it wasn't removing much metal.

Abrasive Shaping
Now I was faced with the abrasive work. I bought a 1x6" rubber sanding belt wheel from Caswell which I saw a link to on the Forge forum at SRP. This was for grinding the hollows, and it got mounted on an 1800 RPM buffer at work. Each hollow took maybe 10 minutes to do, with a beaker of cool water to dip in when the blank got too hot. This was easier than I thought it would be actually, though I'm sure I'm in for some pain when doing the post heat treat grinding.

I also used the wheel to blend the thinned handle to the thicker spine. As someone pointed out in the Forge forum though, this has cut the spine down in some portion of the blade area and will thus make honing the blade more tricky, since usually the razor rides on the blade edge and the spine simultaneously to set the angle during sharpening. So next time I will make the thin to thick transition in the handle area instead of in the blade. This handle to blade transition was easily the most awkward area; it certainly would need refinement in future versions.
A belt sander was used to round the end of the handle and round over the edges that were not done with the corner rounding milling cutter. Then a handheld orbital sander cleaned up some of the rough edges and deeper marks, followed by a deburring wheel on the buffer.
The blade thickness at the edge ended up a little thin for O-1 on the first one, coming in at 1.5mm. The second one I did not mill down so far when cutting the blade bevels, so it is at 2mm. Thinner means less arduous post heat treat grinding, but especially with O-1 problems can arise with too thin an edge during the hardening. If too thin, it can warp badly during the violent thermal events of heat treating. O-1 is also subject to decarburization, wherein the carbon can diffuse out of an appreciable depth of the steel and thus render it incapable of attaining the requisite hardness for good performance as a razor. So one must leave quite a lot of extra metal around the final shape, both to reduce warpage and to provide a buffer layer of material that can be safely decarbeurized. Then the buffer layer is ground off, exposing metal for the edge that has full carbon content for the alloy.
I have arranged with a professional blade maker, Mike Blue, to heat treat these blades. By the several accounts of his work on such pieces, he is a genuine artist when it comes to O-1 heat treating, and one can hope to see less warpage and decarb than might be typical for this alloy. Maybe someday I'll set up a little heat treat furnace, but until then Mike's fees are extremely reasonable.
UPDATE - Finished these razors, described in the post here
1 comment:
Post a Comment